Blank walls in a living room are often viewed as design challenges, but interior stylists see them as pure potential. An empty wall is a clean canvas waiting to reflect your personal style, anchor your furniture layout, and elevate the overall ambiance of your home. Whether you are working with a sprawling double-height wall in an open-concept space or a cozy, compact nook that needs character, the right styling technique can completely shift the energy of the room.
Transforming a blank wall goes beyond simply hanging a single framed print. It is about creating texture, playing with scale, introducing dimensionality, and curating a visual story that feels intentional and lived-in. From oversized architectural elements and organic plaster textures to layered gallery walls and functional statement shelving, this comprehensive guide explores 20 breathtaking, Pinterest-friendly styling ideas.
For each idea, you will discover why it works, the exact materials and supplies you need, step-by-step implementation instructions, creative variations, and practical styling tips to ensure a professional finish.
1. Oversized Abstract Minimalist Canvas Art
An oversized canvas instantly commands attention and serves as a powerful anchor for your living room seating arrangement. Minimalist abstract art brings a sense of calm sophistication without overwhelming the visual field.
- Why It Works: Large-scale art reduces visual clutter by filling a vast expanse with a single, cohesive statement rather than dozens of smaller competing pieces.
- Materials & Supplies Needed: An extra-large blank canvas (minimum 48×60 inches), heavy-body acrylic paints, a large palette knife, gesso, painter’s tape, and a sturdy hanging kit.
- Step-by-Step Instructions:
- Prime your canvas with two coats of white or neutral gesso to create a smooth, durable base.
- Map out a simple composition using low-tack painter’s tape if you prefer clean geometric color blocking, or keep it freeform for organic curves.
- Apply acrylic paint mixed with a heavy texturizing medium using a wide palette knife, building up tactile ridges and smooth sweeps.
- Allow the canvas to cure completely for 48 to 72 hours in a well-ventilated space.
- Secure heavy-duty D-ring hangers to the wooden stretcher bars and mount securely to wall studs using wall anchors.
- Variations: Experiment with monochromatic earth tones (warm beige, terracotta, and cream), add subtle metallic leaf accents in gold or champagne, or try a split-diptych format across two matching canvases.
- Pro Styling Tips: Ensure the center of the canvas sits at eye level (roughly 57 to 60 inches from the floor). Pair with a sleek picture light mounted directly above to create a gallery-like ambiance at night.
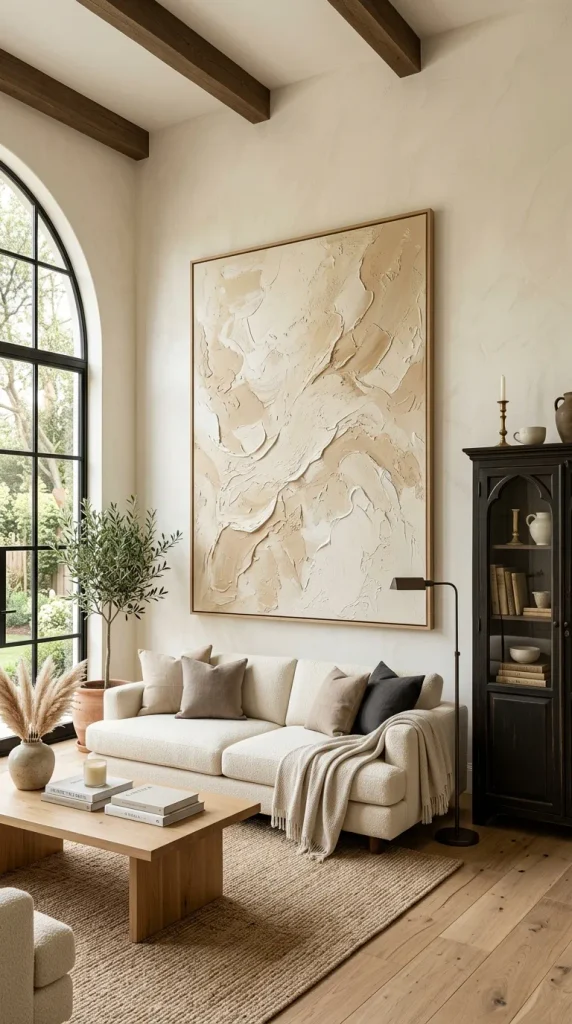
2. Textured Limewash or Venetian Plaster Finish
Instead of hanging objects on your wall, treat the wall itself as the masterpiece by applying a rich, tactile limewash or Venetian plaster finish.
- Why It Works: It introduces depth, warmth, and an organic, cloud-like movement that flat latex paint simply cannot achieve. It catches natural daylight beautifully throughout the day.
- Materials & Supplies Needed: Tinted mineral limewash paint or Venetian plaster, a specialized block brush or stainless steel trowel, painter’s tape, drop cloths, and fine-grit sandpaper.
- Step-by-Step Instructions:
- Clean the wall thoroughly and apply a specialized mineral primer to ensure optimal adhesion.
- Stir your chosen limewash paint thoroughly. Using a large limewash brush, apply the paint in random, criss-cross “X” strokes to create soft, mottled movement.
- Work in sections, maintaining a wet edge to avoid harsh overlap lines.
- Allow the first coat to dry for 4 to 6 hours, then apply a second coat using the same expressive criss-cross motion.
- Lightly polish or buff the surface once dry if using Venetian plaster to achieve a subtle, sophisticated sheen.
- Variations: Choose chalky greiges for a modern minimalist look, deep moody charcoal for dramatic drama, or sun-washed terracotta for a Mediterranean-inspired warmth.
- Pro Styling Tips: Keep furniture placed against this wall relatively simple—such as a clean-lined linen sofa or a minimalist wooden console—so the textured backdrop remains the star of the show.

3. Floor-to-Ceiling Architectural Wooden Slats
Warm wood slats introduce vertical rhythm, modern luxury, and incredible acoustic warmth to a cavernous living room wall.
- Why It Works: Vertical lines draw the eye upward, making ceilings feel higher while the natural wood grain infuses organic warmth into modern interiors.
- Materials & Supplies Needed: Pre-finished wood slat acoustic panels or individual MDF/solid wood slats (oak or walnut veneer), construction adhesive, a brad nailer, a miter saw, a level, and black acoustic backing felt (if not pre-paneled).
- Step-by-Step Instructions:
- Measure the exact height of your wall from baseboard to ceiling.
- Cut your wood slats or panels to the required length using a miter saw.
- Paint the underlying wall a dark matte black or charcoal so that any gaps between slats recede into the shadows.
- Apply construction adhesive to the back of the first panel and press firmly against the wall, checking alignment with a spirit level.
- Secure the panel discreetly by firing brad nails through the felt backing or directly into the side grooves of the wooden slats. Repeat across the wall.
- Variations: Use narrow black-backed acoustic panels for a contemporary Scandinavian look, or wider solid oak planks spaced an inch apart for a mid-century modern aesthetic.
- Pro Styling Tips: Integrate LED strip lighting discreetly behind the edges of the slat wall to create a breathtaking floating halo effect during evening hours.

4. Curated Asymmetrical Gallery Wall
Move away from rigid, symmetrical grids and embrace an organic, storytelling gallery wall featuring a mix of vintage oil paintings, architectural sketches, and personal photography.
- Why It Works: It adds immense personality, visual curiosity, and allows you to curate a dynamic collection of art that can easily expand over time.
- Materials & Supplies Needed: A diverse collection of framed art in varying sizes and frame finishes (warm wood, brushed brass, matte black), kraft paper, scissors, painter’s tape, a hammer, nails, and a level.
- Step-by-Step Instructions:
- Lay all your framed pieces out on the floor and experiment with arrangements until you find a balanced, harmonious composition.
- Trace each frame onto kraft paper, cut out the paper templates, and tape them to the wall using painter’s tape to test the layout.
- Adjust the templates until you are completely satisfied with the spacing (aim for consistent 2-to-3-inch gaps between frames).
- Hammer picture hooks directly through the paper templates into the wall, then tear away the paper.
- Hang your framed artwork securely onto the hooks, checking alignment with a spirit level.
- Variations: Stick to a strict monochromatic color palette for the art prints while mixing ornate antique frames, or keep frames uniform in black metal while featuring colorful botanical illustrations.
- Pro Styling Tips: Anchor the gallery wall by placing a large piece of furniture, like a credenza or sofa, directly beneath it so the arrangement feels grounded rather than floating aimlessly.

5. Built-in Floating Media and Display Shelving
Combine functionality with high-end aesthetic appeal by installing thick, custom floating shelves across your primary living room wall.
- Why It Works: It breaks up a massive blank surface while providing practical display space for books, ceramics, trailing plants, and cherished keepsakes.
- Materials & Supplies Needed: Heavy-duty concealed floating shelf brackets, thick hardwood boards (such as maple or white oak), wood stain or clear matte sealer, a stud finder, a drill, and heavy-duty wall anchors.
- Step-by-Step Instructions:
- Locate and mark wall studs across your empty wall at your desired heights.
- Install the heavy-duty metal bracket rods securely into the wall studs, ensuring they are perfectly level.
- Drill matching holes into the back of your custom wood shelves to slide over the steel support rods.
- Secure the wood shelves onto the brackets using manufacturer-provided set screws.
- Style the shelves using the rule of thirds: balance tall stacked books with horizontal objects, sculptural ceramics, and trailing greenery.
- Variations: Opt for thick white-painted drywall-wrapped box shelves that seamlessly blend into a white wall for a minimalist floating illusion, or rich dark walnut planks for cozy contrast.
- Pro Styling Tips: Leave breathing room on your shelves—do not overcrowd them. Allow at least 30% of empty space on each shelf so the items look curated rather than cluttered.

6. Oversized Round Statement Mirror with Fluted Detailing
A massive round mirror acts as a light amplifier, making compact living rooms feel expansive while adding gorgeous geometric contrast to linear architectural walls.
- Why It Works: Circles soften the harsh angles and straight lines typical of living room architecture (sofas, windows, televisions, and tables), creating instant visual harmony.
- Materials & Supplies Needed: An oversized statement mirror (at least 40 to 48 inches in diameter) with a fluted wood or metallic frame, heavy-duty mirror hanging hardware, and toggle bolts.
- Step-by-Step Instructions:
- Determine the ideal placement height—typically, the center of the mirror should sit approximately 60 inches from the floor, or slightly above the back of a sofa.
- Locate wall studs. If the mirror weight exceeds standard stud placement, install heavy-duty toggle bolts designed for drywall weight capacity.
- Mount the heavy-duty hanging cleat or wire securely to the wall.
- With a helper, lift the mirror and hook it securely onto the wall mount, verifying stability.
- Variations: Choose a fluted white oak frame for a Japandi vibe, an antique brass sunburst frame for vintage glamour, or a sleek black metal rim for industrial modernism.
- Pro Styling Tips: Position the mirror opposite a window or a striking light fixture so it reflects natural light and scenic views back into the living space.


7. Statement Arched Wall Mural with Paint
Paint is the most cost-effective way to redefine a blank wall. Painting a bold, oversized architectural arch creates the illusion of depth and structural detail.
- Why It Works: It mimics the elegance of built-in structural arches, framing furniture or art beautifully without taking up any physical floor space.
- Materials & Supplies Needed: Interior latex paint in a contrasting accent color, painter’s tape, a pencil tied to a piece of string (for drawing the arch curve), a small level, rollers, and fine-tipped artist brushes.
- Step-by-Step Instructions:
- Measure your wall and determine the desired width and height of your painted arch.
- Lightly draw vertical lines using a pencil and level for the straight pillar sides of the arch.
- Create a makeshift compass by tying a piece of string to a pencil, holding the string taut at the desired radius point at the top of your straight lines, and sweeping a clean semi-circle.
- Carefully apply painter’s tape along the outside edge of your pencil lines, pressing down firmly to prevent paint bleeding.
- Fill in the interior with your accent paint using a roller for the body and an angled brush for crisp edges. Apply two coats.
- Peel away the painter’s tape while the final coat is slightly damp for razor-sharp lines.
- Variations: Paint an off-center asymmetrical arch, a multi-layered nested arch in cascading tonal shades, or a moody dark sage arch behind a light-colored sofa.
- Pro Styling Tips: Center a chic console table, a floor lamp, or a fiddle-leaf fig tree directly in front of the painted arch to create a dimensional vignette.
8. Full-Height Textured Ceramic or Terracotta Tile Wall
Bring unexpected texture and high-end artisanal craftsmanship to your living room by tiling an entire feature wall with handmade-look zellige or textured terracotta tiles.
- Why It Works: It introduces incredible tactile richness, organic color variations, and reflects light in a mesmerizing, undulating pattern.
- Materials & Supplies Needed: Handmade ceramic zellige tiles, tile adhesive (thinset), notched trowel, tile spacers, wet tile saw, tile grout, rubber grout float, and sponge.
- Step-by-Step Instructions:
- Prepare and prime the drywall surface. Snap chalk lines to ensure your tile layout starts straight and level.
- Mix your thinset mortar and apply it to the wall using a notched trowel in manageable sections.
- Press the tiles firmly into the mortar. Because handmade tiles feature intentional slight irregularities, keep grout joints tight and organic.
- Allow the tile installation to set for 24 hours.
- Apply matching grout across the surface using a rubber float, wiping away excess grout with a damp sponge before it cures completely.
- Variations: Choose soft glossy cream zellige for a serene, light-reflecting backdrop, or warm rust terracotta tiles for an earthy, grounded southwestern feel.
- Pro Styling Tips: Keep surrounding decor minimal—let the variation and sheen of the handcrafted tiles speak for themselves without heavy ornamentation.
9. Modern Upholstered Fabric Wall Panels
Acoustic fabric wall panels wrapped in luxurious linen or bouclé fabric transform a harsh living room wall into a soft, tactile sanctuary.
- Why It Works: It dampens echo and reverberation in large, open-concept rooms while adding incredible hotel-luxury softness and texture.
- Materials & Supplies Needed: Plywood backing boards, high-density foam padding, upholstery fabric (linen, velvet, or heavy bouclé), a heavy-duty staple gun, and mounting cleats.
- Step-by-Step Instructions:
- Cut plywood boards to your desired modular rectangular or square dimensions.
- Cut matching pieces of high-density foam and place them over the plywood boards.
- Wrap your chosen upholstery fabric tightly around the foam and plywood, securing it neatly on the back with heavy-duty staples (mitering the corners cleanly).
- Mount heavy-duty z-clips or French cleats to the back of each upholstered panel and corresponding wall spots.
- Lock the panels securely into place across the wall.
- Variations: Create an oversized grid pattern using thick bouclé fabric panels behind your sofa for an ultra-cozy, high-texture lounge aesthetic.
- Pro Styling Tips: Pair upholstered wall panels with sleek metal or marble accent furniture to create a stunning contrast between soft fabrics and hard, polished surfaces.
10. Minimalist Picture Ledge Gallery Display
Install slim floating picture ledges across your blank wall to create an adjustable, ever-changing art and photography display.
- Why It Works: It eliminates the need to hammer dozens of individual nails into your wall. You can easily swap, layer, and rearrange frames whenever inspiration strikes.
- Materials & Supplies Needed: 2 to 3 wooden or metal picture ledges, wall anchors, screws, a stud finder, a spirit level, and an assortment of framed prints in varying sizes.
- Step-by-Step Instructions:
- Determine the ideal mounting heights for your ledges (typically one ledge at eye level and one about 18–24 inches below it).
- Use a stud finder to locate studs, mark screw locations, and pre-drill holes.
- Secure the picture ledges firmly to the wall using screws and appropriate wall anchors, verifying they are completely level.
- Rest your framed artwork on the ledges, overlapping frames slightly for a casual, curated studio feel.
- Variations: Paint the picture ledges the exact same color as your wall for a seamless, built-in look where the frames appear to float magically.
- Pro Styling Tips: Intermix framed art with small sculptural objects, brass candlesticks, and small potted trailing plants resting on the ledges for extra depth.
11. Industrial Iron and Glass Partition Screen
Divide a large open space or style a blank wall with a statement industrial black steel and frosted or fluted glass room divider screen mounted flat against the wall.
- Why It Works: It introduces striking modern architectural structure, industrial edge, and plays with transparency and light reflection.
- Materials & Supplies Needed: Custom steel-framed glass panel, heavy-duty wall mounting brackets, anchoring bolts, and professional installation assistance due to weight.
- Step-by-Step Instructions:
- Measure the exact wall space and ensure the wall structure can support the weight of a steel-and-glass installation.
- Secure heavy-duty steel mounting brackets into structural wall studs or concrete backing.
- Carefully mount the steel-framed glass panel flush against the wall surface.
- Clean the glass thoroughly to remove fingerprints and maximize light reflection.
- Variations: Use reeded or reeded-fluted glass for added privacy and vintage texture, or clear glass backed by an accent wall color.
- Pro Styling Tips: Place a sleek leather lounge chair and a task floor lamp next to the glass screen to create a sophisticated reading nook.
12. Oversized Woven Tapestry or Macrame Wall Hanging
Soften hard architectural lines and introduce rich bohemian or organic modern texture with a large-scale textile wall hanging.
- Why It Works: Textiles absorb sound, add instant warmth, and break up large expanses of drywall without heavy construction or framing.
- Materials & Supplies Needed: A large woven wall hanging or macrame piece, a sturdy wooden dowel or wrought iron rod, and matching wall brackets.
- Step-by-Step Instructions:
- Slide your wooden dowel or iron rod through the top hanging sleeve or loops of your textile piece.
- Mount decorative wall brackets or hooks securely into wall studs at the desired height.
- Rest the rod evenly across the brackets, ensuring the tapestry hangs straight and unblemished.
- Steam or gently comb out any fringe or threads that became wrinkled during packaging.
- Variations: Choose a minimalist geometric woven wool tapestry in neutral earth tones, or an intricate oversized cream cotton macrame piece.
- Pro Styling Tips: Hang the tapestry behind a low-profile media console or accent chair to anchor the furniture piece below it naturally.
13. Reclaimed Wood Accent Wall with Hidden LED Backlighting
Introduce rustic charm and incredible natural grain variation by cladding your blank living room wall in reclaimed barn wood planks.
- Why It Works: Reclaimed wood tells a story, adds deep organic texture, and creates a magnificent cabin-chic or rustic-modern focal point.
- Materials & Supplies Needed: Reclaimed wood planks (varying widths and thicknesses), construction adhesive, a finish nailer, a miter saw, and an LED strip lighting kit.
- Step-by-Step Instructions:
- Clean all wood planks thoroughly and let them acclimate to your indoor humidity for 48 hours.
- Plan your layout on the floor first, mixing dark and light grain patterns evenly.
- Run an adhesive LED strip channel along the perimeter of the wall behind where the wood will sit to create a glowing border effect.
- Apply construction adhesive to the back of each plank and secure it to the wall using a finish nailer, staggering the end joints between rows.
- Cut planks around electrical outlets using a jigsaw.
- Variations: Use weathered gray barn wood for a coastal rustic vibe, or rich amber-toned pine planks for mountain lodge warmth.
- Pro Styling Tips: Contrast the rustic wood texture with sleek, polished brass or matte black contemporary furniture to keep the space feeling modern rather than dated.
14. Dramatic Dark Moody Color Blocking
Create instant drama and sophistication by painting a bold geometric color-blocked shape behind your living room seating area.
- Why It Works: Color blocking allows you to define functional zones in an open-plan living room and makes furniture pop against the deep background hue.
- Materials & Supplies Needed: Premium matte interior paint in two contrasting shades (e.g., warm cream and deep forest green), painter’s tape, a laser level, rollers, and brushes.
- Step-by-Step Instructions:
- Paint the entire wall in your lighter base shade and allow it to cure fully for 24 hours.
- Use a laser level to project crisp horizontal or diagonal lines across the wall where your color block will meet.
- Apply painter’s tape firmly along the laser line, sealing the edge with a thin layer of base coat paint to prevent bleeding.
- Fill in your geometric block with the darker accent paint using two coats.
- Peel off the tape while the paint is still slightly tacky for razor-sharp geometric perfection.
- Variations: Paint an asymmetric color-blocked stripe that wraps around the corner of the room, or a dramatic deep navy color block that frames your television.
- Pro Styling Tips: Hang lighter-colored artwork or mount a warm wood floating shelf across the dark color block to create stunning contrast and depth.


15. Botanical Wallpaper Mural with Matte Finish
Transform your blank wall into a serene natural paradise using a peel-and-stick or paste-the-wall oversized botanical mural.
- Why It Works: It envelops the room in immersive scenery, bypassing the need for additional art while infusing organic color and life.
- Materials & Supplies Needed: Premium non-woven wallpaper mural panels, wallpaper paste (if not peel-and-stick), a smoothing tool, a sharp utility knife, a plumb line, and a damp sponge.
- Step-by-Step Instructions:
- Draw a vertical plumb line on your wall to ensure your first mural panel goes up perfectly straight.
- Apply wallpaper adhesive to the wall or peel the backing off your panel progressively from top to bottom.
- Smooth the mural panel onto the wall using a soft smoothing tool, pushing outward from the center to eliminate air bubbles.
- Align subsequent panels carefully to match the botanical pattern repeat seamlessly.
- Trim excess wallpaper at the ceiling and baseboard using a sharp utility knife against a metal straight edge.
- Variations: Choose a misty vintage forest mural for a moody, atmospheric feel, or a soft watercolor wildflower meadow for airy brightness.
- Pro Styling Tips: Pull accent colors directly from the mural (like sage green, dusty rose, or ochre) for your throw pillows, rugs, and decorative accessories.
16. Grid of Nine Matching Framed Prints
Achieve classic architectural symmetry and sophisticated order by hanging a uniform grid of nine identically framed botanical or architectural prints.
- Why It Works: Grid arrangements bring instant calm, structured elegance, and timeless traditional appeal to any living room space.
- Materials & Supplies Needed: 9 identical frames (e.g., 16×20 inches), 9 matching art prints, a laser level, measuring tape, hammer, nails, and painter’s tape.
- Step-by-Step Instructions:
- Calculate the total wall dimensions and determine the exact center point for your grid array.
- Use a laser level to map out the outer boundaries and the internal 2-to-3-inch spacing between all nine frames.
- Hang the center frame first to establish your anchor point.
- Work outward in all directions, meticulously checking each frame with a spirit level before securing it to the wall.
- Variations: Feature black-and-white architectural photography in sleek black frames, or vintage pressed botanical illustrations in warm gold frames with wide white mats.
- Pro Styling Tips: Ensure the bottom row of frames sits roughly 8 to 10 inches above the top of your living room sofa backrest for comfortable visual spacing.
17. Floating Concrete-Look Ledge with Minimalist Decor
Inject modern industrial flair into your living room by mounting a sleek, ultra-thin concrete-finish floating shelf.
- Why It Works: Concrete provides a raw, tactile brutalist elegance that contrasts gorgeously with soft living room textiles like velvet, linen, and wool.
- Materials & Supplies Needed: Lightweight concrete-composite shelf or faux-concrete wrap board, concealed steel bracket system, wall anchors, and heavy-duty drill.
- Step-by-Step Instructions:
- Locate and mark wall studs at your desired installation height.
- Mount the heavy-duty internal steel bracket system securely into the studs, verifying level alignment.
- Slide the lightweight concrete-finish shelf casing over the internal support bracket.
- Secure with set screws and style with minimalist brass objects, stacked art books, and a trailing pothos plant.
- Variations: Use a polished micro-cement finish for a sleek Japandi aesthetic, or raw gray concrete for an urban loft vibe.
- Pro Styling Tips: Lean two or three framed monochrome sketches against the wall on top of the ledge rather than hanging them, giving the display an effortless studio feel.
18. Floating Leather and Brass Hanging Straps with Wood Plank
Create a bespoke, artisanal wall display by suspending a solid oak plank from the wall using heavy-duty saddle leather straps and brass hardware.
- Why ItWorks: It combines mixed materials—warm wood, rich leather, and polished brass—in a compact, stylish display that feels handcrafted and unique.
- Materials & Supplies Needed: A solid oak or walnut board, two pre-cut leather hanging straps, brass screw posts, wall anchors, and matching brass screws.
- Step-by-Step Instructions:
- Wrap your leather straps around the ends of the wood board to test the fit and mark your hanging hole locations on the wall.
- Drill holes into the wall and insert sturdy wall anchors.
- Secure the top loop of each leather strap to the wall using brass screws and decorative washers.
- Slide the wood plank securely into the hanging leather loops, adjusting until the shelf hangs level and stable.
- Variations: Use cognac tan leather straps with natural oak for a Scandinavian warmth, or black leather straps with dark walnut for a moody modern look.
- Pro Styling Tips: Style the shelf with a ceramic diffuser, a scented candle, and a small stack of curated design books.
19. Statement 3D Geometric Wall Molding Panels
Add classic European molding boxes with a modern 3D twist to elevate a plain drywall surface into high-end architectural elegance.
- Why It Works: Wall moldings add instant character, architectural pedigree, and sophisticated shadow play across empty walls.
- Materials & Supplies Needed: Lightweight polyurethane or wood molding strips, miter box, saw, construction adhesive, finish nailer, caulk, and satin wall paint.
- Step-by-Step Instructions:
- Plan your box molding layout on the wall with chalk, ensuring symmetrical spacing between frames and borders.
- Cut your molding strips at precise 45-degree angles using a miter saw and miter box for clean corner joints.
- Apply construction adhesive to the back of each cut molding piece and press it firmly against the wall along your chalk lines.
- Secure with a finish nailer at diagonal angles.
- Fill all nail holes and corner seams with paintable caulk, let dry, and paint the entire wall and molding in a uniform satin finish.
- Variations: Paint the molding and the wall the exact same deep color (monochromatic drenched look) for contemporary drama, or crisp gallery white for traditional elegance.
- Pro Styling Tips: Keep furniture arrangements clean and understated against a paneled wall so the intricate shadow lines remain the focal point.
20. Oversized Round Rattan or Woven Sunburst Panel
Bring organic warmth, coastal charm, and intricate handcrafted texture to a blank wall with an oversized natural rattan sunburst or woven wall disk.
- Why It Works: It introduces natural fibers, organic curves, and tactile dimension that immediately warms up sterile or cold living room spaces.
- Materials & Supplies Needed: Oversized rattan sunburst wall sculpture or woven basket disk (minimum 36 inches diameter), heavy-duty wall hook, and picture wire.
- Step-by-Step Instructions:
- Locate the center point of your blank wall and drive a sturdy wall anchor and hook into place.
- Attach reinforced picture hanging wire securely across the back framework of your rattan sculpture.
- Hang the piece securely on the wall hook, stepping back to ensure it is centered and balanced.
- Dust periodically with a soft brush to keep the natural fibers looking pristine.
- Variations: Cluster a collection of varying sizes of vintage woven African baskets for an eclectic bohemian statement, or hang a single massive bleached rattan sunburst disk for coastal minimalism.
- Pro Styling Tips: Pair with neutral linen slipcovered seating, jute area rugs, and abundant indoor greenery to complete an effortless organic sanctuary look.
Summary and Future Additions
Transforming a blank living room wall does not require a complete structural renovation—just a clear vision, the right materials, and a touch of creativity. Whether you choose the calm simplicity of an oversized abstract canvas, the rich tactile warmth of limewash paint, or the architectural elegance of wood slats, your living room will instantly feel more curated, complete, and deeply personal.
More ideas to come in future addition.


