Spread the love

Hand-painted ceramics have emerged as one of the most expressive, tactile, and rewarding artistic mediums. Whether you are working with bisqueware ready for commercial underglaze, air-dry clay pieces cured on your studio desk, or plain terracotta pots sourced from a garden center, transforming raw clay surfaces into stunning fine art allows you to merge sculpture with illustration.

This comprehensive guide breaks down 20 elevated, highly aesthetic pottery painting concepts. Each idea provides an in-depth design breakdown, complete step-by-step painting instructions, essential studio tips, creative variations, and material recommendations to help you create heirloom-quality functional and decorative pottery.

Ceramic Painting Essentials: Preparation and Finishing

Achieving smooth, vibrant, and durable paintwork on pottery requires understanding the structural behavior of clay and color mediums.

1. Mediterranean Citrus Orchard

Design Meaning & Aesthetic Essence

Inspired by the sun-drenched coasts of Southern Italy and the Greek islands, this concept celebrates vitality, warmth, and organic freshness. It pairs rich, painterly lemons and oranges against raw terracotta or soft cream backgrounds, channeling the timeless beauty of Mediterranean alfresco dining.

Materials Needed

  • Lemon yellow, deep cadmium orange, olive green, warm ochre, and titanium white paints
  • Round brushes (sizes #2 and #6)
  • Flat wash brush
  • High-gloss food-safe glaze or gloss varnish

Step-by-Step Execution

  1. Base Layer: Apply a smooth, milky white or light oatmeal base coat over the vessel. Leave the base slightly sheer if you desire an authentic rustic look.
  2. Fruit Layout: Use a dilute wash of yellow ochre to sketch asymmetrical clusters of lemons and oranges around the rim and belly of the piece.
  3. Color Blocking: Fill the citrus shapes using flat yellow and orange tones, keeping edges organic rather than perfectly circular.
  4. Shading & Dimension: Blend a hint of raw umber or terracotta orange into the shadows of each fruit while the base paint is wet. Add a soft white highlight curve along the upper curve.
  5. Foliage & Stems: Paint slender, pointed leaves using deep olive green, accented with sap-green veining and warm brown woody stems connecting the clusters.
  6. Finishing Details: Add fine olive-green speckles across open areas for an artisanal, hand-thrown feel.

Studio Tips & Creative Variations

  • Tip: Work wet-on-wet on the citrus shapes to create natural, soft gradients across the rinds.
  • Variation (Blue Chintz Background): Add delicate cobalt-blue mosaic scrolls behind the lemons for an authentic Sicilian Majolica look.
  • Variation (Blood Orange Theme): Swap classic yellow lemons for deep crimson, sliced-open blood oranges exposing detailed segments.
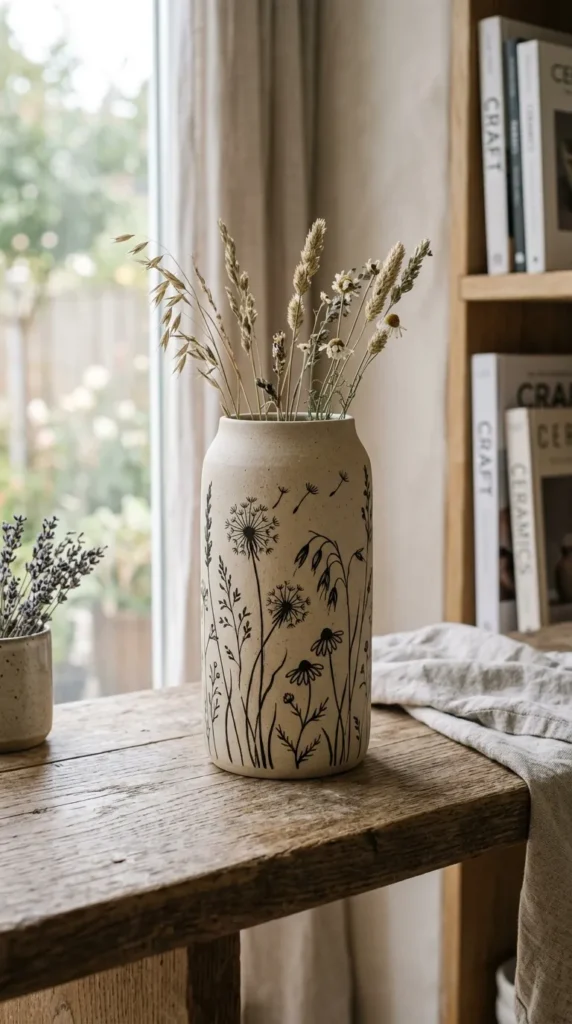
2. Minimalist Wildflower Silhouette

Design Meaning & Aesthetic Essence

This design focuses on restraint, elegance, and natural movement. Drawing inspiration from pressed botanical herbariums, delicate black or earth-toned wildflower silhouettes are painted against raw, unglazed clay surfaces, creating a refined modern Scandinavian feel.

Materials Needed

  • Ultra-fine liner brush (size #00 or #0)
  • Flat angular shader
  • Jet black, charcoal grey, or deep sepia acrylic/underglaze
  • Ultra-matte topcoat

Step-by-Step Execution

  1. Surface Preparation: Sand the dry clay completely smooth using fine-grit sandpaper, wiping away all residual dust.
  2. Compositional Stems: Paint long, delicate, sweeping stem lines that start from the base of the vessel and curve naturally around its contours.
  3. Botanical Details: Add miniature seed heads, airy dandelion puffs, tiny meadow grass blades, and subtle chamomile flower heads branching off the central stems.
  4. Varying Line Weight: Apply variable pressure to the liner brush to create organic thick-and-thin linework that mimics real plant anatomy.
  5. Matte Protection: Apply a water-based ultra-matte varnish or matte glaze to preserve the natural, tactile stone look of the raw clay.

Studio Tips & Creative Variations

  • Tip: Rest your pinky finger gently on dry sections of the pottery to steady your hand when executing long, continuous hairline strokes.
  • Variation (Negative Space Silhouettes): Paint the entire background dark, leaving the delicate wildflower shapes unpainted to reveal the raw light clay underneath.
  • Variation (Golden Stems): Paint the botanical silhouettes using metallic gold leaf or liquid gold over a soft white background.

3. Celestial Midnight Moon Phase

Design Meaning & Aesthetic Essence

This mystical, moody concept brings the quiet beauty of the cosmos into functional ceramics. Deep, cosmic indigo and black backgrounds contrast sharply with luminous, crater-detailed moon phases and shimmering gold-star constellations.

Materials Needed

  • Deep Prussian blue, jet black, violet, titanium white, and metallic gold luster/paint
  • Dense makeup sponge or stippling brush
  • Fine detail brush (#0)
  • Glossy ceramic topcoat

Step-by-Step Execution

  1. Cosmic Gradient: Sponge a seamless blend of dark indigo, night black, and rich purple across the vessel to build depth.
  2. Moon Phase Layout: Mark out eight evenly spaced circular centers around the circumference of the vessel.
  3. Painting the Moon Cycle: Paint the complete lunar cycle starting from a dark new moon, moving through waxing crescents, quarter moons, gibbous phases, and a glowing central full moon.
  4. Crater Texture: Stipple soft grey and diluted charcoal washes onto the bright white lunar surfaces to build realistic lunar crater textures.
  5. Constellations & Stardust: Splatter micro-droplets of thin titanium white paint using a stiff toothbrush, then paint delicate, connected gold-line constellations.

Studio Tips & Creative Variations

  • Tip: Keep the paint barely damp on your sponge when blending cosmic gradients to prevent colors from becoming muddy.
  • Variation (Rose Gold Celestial): Replace deep indigo with dusty mauve-grey and paint lunar cycles in soft rose gold.
  • Variation (Single Statement Moon): Paint a single oversized, textured full moon on the belly of a deep charcoal pitcher.

4. Vintage Botanical Fern Garden

Design Meaning & Aesthetic Essence

Channeling antique natural history illustrations and Victorian greenhouse conservatories, this design layers rich forest greens, soft sage, and chartreuse fronds across an aged parchment or creamy ceramic background.

Materials Needed

  • Deep forest green, moss green, pale sage, warm parchment/cream, and burnt umber paints
  • Small filbert brush and fine script liner
  • Satin protective finish

Step-by-Step Execution

  1. Vintage Ground: Coat the vessel in a warm, antique cream or soft linen tone.
  2. Spine Lines: Draw sweeping, graceful arching stems across the piece using a medium olive green.
  3. Frond Architecture: Paint individual fern leaves stemming outward along each spine, tapering the size down toward the delicate tip.
  4. Layering Depth: Layer darker forest green fronds behind softer, lighter sage-green fronds to create three-dimensional botanical depth.
  5. Aged Edges: Lightly dry-brush burnt umber around the rim and base of the vessel to create an authentic antique bookplate look.

Studio Tips & Creative Variations

  • Tip: Paint the leafy fronds with single, rhythmic press-and-lift brushstrokes to give natural organic taper to every leaf.
  • Variation (Fiddlehead Motifs): Add unfurling young fern fiddleheads spiraling gracefully up the neck of the vase.
  • Variation (Monochrome Sage): Paint the entire fern study using varying opacities of a single muted sage green tone.

5. Modern Abstract Color Block & Memphis Curves

Design Meaning & Aesthetic Essence

Celebrating modern interior design movements, this concept combines geometric color blocks, playful squiggles, terrazzo chips, and soft pastel shapes to produce bold, joyful, museum-worthy ceramic pieces.

Materials Needed

  • Dusty terracotta, mustard yellow, sage green, blush pink, and cobalt blue paints
  • Flat synthetic wash brushes (1/4″ and 1/2″)
  • Fine round detail brush
  • Painter’s delicate-surface tape
See also  12 Aesthetic Rock Painting Ideas

Step-by-Step Execution

  1. Section Masking: Use painter’s tape to block off clean diagonal, curved, or semi-circular geometric zones across the vessel.
  2. Color Application: Apply two opaque coats of modern pastel and earth tones within the masked sections.
  3. Organic Counterparts: Freehand paint soft, fluid arches, floating kidney shapes, and wavy ribbons overlapping the geometric edges.
  4. Pattern Accents: Paint miniature dashes, scattered polka dots, and tiny terrazzo flecks inside selected color blocks.
  5. Outline Balance: Frame select boundaries with thin, crisp black or white accent lines.

Studio Tips & Creative Variations

  • Tip: Remove painter’s tape while the paint is still slightly damp to achieve razor-sharp, bleed-free color borders.
  • Variation (Earth Tone Neutral): Limit the color palette exclusively to warm beige, cream, chocolate brown, and raw sienna.
  • Variation (Primary Pop): Use bold Yves Klein blue, rich cherry red, and vibrant saffron yellow on stark white ceramics.

6. Serene Japanese Ocean Waves (Seigaiha Influence)

Design Meaning & Aesthetic Essence

Drawing inspiration from traditional Japanese woodblock prints and coastal seascapes, this style captures dynamic cresting waves, rhythmic water ripples, and frothy foam lines in indigo, aqua, and crisp white.

Materials Needed

  • Indigo blue, deep navy, seafoam teal, and pure titanium white paints
  • Medium round brush and medium rigger/liner brush
  • Gloss finish to mimic water sheen

Step-by-Step Execution

  1. Base Gradient: Paint a smooth gradient starting from deep navy at the base of the vessel, transitioning upward into pale aquatic teal.
  2. Wave Formations: Paint bold, curling wave arches that curl inward and swirl around the contours of the pottery.
  3. Foam Crests: Use thick, semi-opaque white paint to define the roaring foam crests and crashing wave tips.
  4. Linear Ripple Lines: Paint parallel rhythmic curved lines tracing the motion of the water underneath each wave crest.
  5. Spray Droplets: Add tiny, delicate white stippled dots around the wave crests to mimic ocean mist.

Studio Tips & Creative Variations

  • Tip: Keep your wrist loose and rotate the ceramic pot continuously on a pottery turntable to keep wave arcs smooth and fluid.
  • Variation (Traditional Seigaiha): Paint the precise, overlapping geometric rainbow-like sea scale pattern across the entire pot in crisp cobalt blue.
  • Variation (Golden Sunset Sea): Add soft coral and gold highlights along the wave ridges.

7. Moody Baroque Gilded Florals

Design Meaning & Aesthetic Essence

Inspired by 17th-century Dutch master floral still-life paintings, this luxurious style embraces high drama, lush dark backgrounds, blooming peonies, deep velvet roses, and subtle metallic gold accents.

Materials Needed

  • Midnight black, deep burgundy, dusty plum, antique cream, and pale blush paints
  • Metallic liquid gold leaf or ceramic gold luster
  • Medium filbert and detail shading brushes
  • Ultra-high-gloss finish

Step-by-Step Execution

  1. Dramatic Ground: Cover the entire vessel in a deep, opaque black, charcoal, or dark aubergine base.
  2. Under-drawing: Lightly sketch large, overlapping garden roses, open peonies, and drooping tulips using a light watercolor pencil.
  3. Deep Underpainting: Paint the silhouettes of petals in rich, muted tones like wine red, plum, and warm taupe.
  4. Highlighting Petals: Build up delicate highlights on the edges of opening petals using dusty pink and warm ivory.
  5. Gilded Accents: Apply thin lines of liquid gold leaf along petal veins, pistils, and select stem outlines.

Studio Tips & Creative Variations

  • Tip: Blend petal edges smoothly into the dark background to evoke that classical museum chiaroscuro lighting effect.
  • Variation (Monochrome Dutch Dark): Paint all florals entirely in shades of slate grey and cream against a jet-black ground.
  • Variation (Gilded Insect Additions): Paint delicate gold honeybees and dragonflies resting among the dark blooms.

8. Moroccan Terracotta Mosaic Tile (Zellij Pattern)

Design Meaning & Aesthetic Essence

A vibrant celebration of North African architecture and artisan craft, this style brings intricate interlocking geometric stars, diamonds, and tessellations to the curved surfaces of pottery.

Materials Needed

  • Cobalt blue, saffron yellow, turquoise, terracotta red, and off-white paints
  • Precision fine liner brush (#0)
  • Flexible drafting tape or pencil compass
  • Semi-gloss ceramic sealant

Step-by-Step Execution

  1. Grid Setup: Lightly divide the ceramic piece into balanced vertical and horizontal quadrants using soft pencil guide markings.
  2. Central Star Points: Paint eight-pointed star motifs centered within each focal quadrant.
  3. Interlocking Geometry: Radiate interlocking diamond tiles, strapwork ribbons, and cross patterns outward from the central stars.
  4. Color Distribution: Alternate vibrant turquoise, cobalt, and warm terracotta within adjacent geometric pockets.
  5. Grout Lines: Trace crisp off-white or deep charcoal borders around each individual “tile” section to emulate authentic hand-cut mosaic tessellation.

Studio Tips & Creative Variations

  • Tip: Use flexible silicone pottery measuring tapes to measure symmetrical repeating intervals across curved surfaces.
  • Variation (Monochrome Fez Blue): Execute the entire intricate tile pattern using only cobalt blue over a clean white ground.
  • Variation (Distressed Antiqued Tile): Lightly buff painted tile sections with fine steel wool before sealing to create an aged Moroccan courtyard look.

9. Whimsical Pastel Cottagecore Mushrooms & Flora

Design Meaning & Aesthetic Essence

Tapping into enchanting woodland folklore, this aesthetic balances playfulness with delicate vintage charm. It features illustrated amanita mushrooms, wild strawberries, and forest snails rendered in a soft pastel color story.

Materials Needed

  • Coral red, peach, buttercup yellow, pale moss, lavender, and milk white paints
  • Round detail brushes (#1 and #3)
  • Matte or satin topcoat

Step-by-Step Execution

  1. Soft Ground: Leave raw warm clay exposed or apply a creamy buttermilk wash across the pottery.
  2. Mushroom Shapes: Paint whimsical clusters of toadstools with curved, domed caps in soft coral, butter yellow, and pastel peach.
  3. Gills & Stems: Add slender off-white stems with textured undersides and delicate under-cap skirts.
  4. Cap Textures: Paint tiny, crisp white dots across the mushroom caps, varying their size from large center marks to tiny edge flecks.
  5. Woodland Ground: Paint tiny wild strawberry blossoms, soft clover patches, and curling moss sprigs around the base of the mushrooms.

Studio Tips & Creative Variations

  • Tip: Use the wooden end of your paint brush handle dipped in white paint to stamp perfectly uniform dots onto mushroom caps.
  • Variation (Fairytale Night Forest): Paint the woodland scene on deep forest-green clay with bioluminescent glowing mushrooms in mint green.
  • Variation (Botanical Specimen Style): Add delicate calligraphy naming the mushroom species underneath each painted cluster.

10. Golden Kintsugi & Organic Marble Veins

Design Meaning & Aesthetic Essence

Honoring the Japanese philosophy of Wabi-Sabi—finding beauty in imperfection—this design pairs fluid faux-marble color swirling with branching metallic gold rivers that trace organic ceramic forms.

Materials Needed

  • Dove grey, charcoal, warm beige, soft cream, and high-shine liquid gold pigment
  • Wide flat wash brush, feather or soft fan brush
  • Fine liner brush
  • Glass-like high-gloss finish

Step-by-Step Execution

  1. Stone Background: Apply a rich, opaque coat of warm off-white or soft alabaster paint across the vessel.
  2. Marble Veining: While the base coat is slightly workable, drag a soft feather or fan brush dipped in diluted charcoal and beige to create wandering, smoky marble lines.
  3. Diffusion: Soften the marble edges using a damp sea sponge to simulate natural, diffused stone striations.
  4. Kintsugi Fractures: Use a fine liner brush with bright liquid gold to paint dynamic, branching fracture lines sweeping across the vessel.
  5. Gold Knots: Paint small solid gold puddles at the intersections where fracture lines cross one another.

Studio Tips & Creative Variations

  • Tip: Allow your hand to shake slightly when painting gold fracture lines; natural organic fractures should never look like rigid straight lines.
  • Variation (Emerald & Gold Veining): Replace white marble with deep emerald green and malachite stone swirls under the gold fractures.
  • Variation (Matte Stone / Gloss Gold): Seal the marble body in ultra-matte finish while keeping the gold lines ultra-glossy for striking textural contrast.
See also  12 Easy Flower Pot Painting Ideas

11. Desert Bohemian Sunset Landscape

Design Meaning & Aesthetic Essence

Channeling the tranquility of southwestern canyon vistas, this style uses earthy gradients, minimalist layered mountain silhouettes, saguaro cacti, and warm radiating sun motifs.

Materials Needed

  • Terracotta, burnt sienna, dusty rose, golden ochre, sand, and cream paints
  • Flat synthetic wash brushes (various widths)
  • Ultra-fine round detail brush
  • Matte clay sealer

Step-by-Step Execution

  1. Radiant Sky: Paint a minimalist horizon line and a large, semi-circular sun resting along the top third of the ceramic form.
  2. Layered Dunes & Mesas: Paint overlapping undulating mountain ridges sweeping across the center of the piece in stepped gradients of rose, terracotta, and sienna.
  3. Desert Horizon: Use a warm sand-ochre tone for the foreground plains.
  4. Silhouette Flora: Paint small, minimalist saguaro cacti and sparse Joshua trees along the mountain ridges using deep espresso or dark sage.
  5. Sun Rays: Paint delicate, clean concentric arcs radiating upward from the sun toward the rim of the pot.

Studio Tips & Creative Variations

  • Tip: Keep your paint consistency creamy to ensure mountain ridges have solid, opaque edge definition without visible brush streaks.
  • Variation (Night Desert): Swap sunset tones for twilight plum, slate blue, sand tones, and a silver moon rising over the dunes.
  • Variation (Abstract Linear Sunset): Paint the entire landscape as clean, horizontal parallel stripes of desert shades without botanical elements.

12. Soft Impressionist Meadow & Monet Garden

Design Meaning & Aesthetic Essence

Emulating the dappled light and painterly brushwork of French Impressionism, this technique transforms a ceramic vase or bowl into a blooming, atmospheric summer meadow filled with loose, textural color strokes.

Materials Needed

  • Sky blue, lavender, buttercup yellow, blush pink, viridian green, and warm white paints
  • Short flat bristle brushes and filbert brushes (sizes #2 and #4)
  • Glossy or semi-gloss finish

Step-by-Step Execution

  1. Atmospheric Sky: Dab a soft, hazy mix of diluted sky blue, pale lilac, and warm white around the upper half of the vessel.
  2. Impressionistic Foliage: Apply short, directional dabs of mixed greens (olive, viridian, chartreuse) to create the soft, blurry body of a summer field.
  3. Layered Petal Dabs: Use thick, unblended dabs of vibrant pink, lavender, and butter yellow across the green field to represent distant wildflowers.
  4. Foreground Flourish: Bring a few select flower stems in the foreground into sharper focus with quick, defined strokes of a detail brush.
  5. Light Splatters: Lightly speckle the lower half with pale gold and white flecks to simulate warm, sparkling afternoon sunbeams.

Studio Tips & Creative Variations

  • Tip: Do not overmix your colors on the palette; load two contrasting colors (like yellow and green) onto the brush at once for dynamic, painterly strokes.
  • Variation (Monet Water Lilies): Paint floating lily pads and reflective pond waters using deep blues, teals, and soft pink floating blooms.
  • Variation (Moody Autumn Field): Shift the palette to russet orange, mustard, deep burgundy, and smoky blue.

13. Blue Delftware & Chinoiserie Porcelain Motifs

Design Meaning & Aesthetic Essence

A tribute to historic Dutch Delft and Chinese Ming dynasty porcelain, this iconic aesthetic pairs a pure white glossy ceramic surface with intricate, highly detailed cobalt-blue botanical and scenic vignettes.

Materials Needed

  • High-pigment cobalt blue underglaze or ceramic paint
  • Pale cerulean blue (for shading washes)
  • Pure titanium white
  • Fine detail rigger brush and medium pointed round brush
  • Ultra-high-gloss transparent glaze

Step-by-Step Execution

  1. Porcelain Ground: Ensure the bisque body is perfectly clean or coated in a crisp, opaque porcelain-white ground.
  2. Border Scrollwork: Paint ornamental scrolling vines, acanthus leaves, and fretwork patterns framing the rim and foot of the pot.
  3. Central Cartouche: Sketch a classic scenic centerpiece—such as a whimsical songbird perched on a blossoming peony branch, or a traditional Dutch windmill landscape.
  4. Tonal Washes: Use diluted cerulean washes to lay down soft, watercolor-like shadows inside the flower petals and bird feathers.
  5. Fine Cobalt Contours: Outline all main elements with intense, undiluted deep cobalt linework to create crisp, unmistakable Delftware contrast.

Studio Tips & Creative Variations

  • Tip: Work with ceramic water-soluble underglazes to achieve genuine watercolor-style wash gradations within the blue monochrome scheme.
  • Variation (Modern Delft): Paint contemporary, minimalist botanical silhouettes or abstract line faces using traditional cobalt blue.
  • Variation (Chinoiserie Dragon): Paint a traditional Chinese dragon winding around the vessel amid floating stylized clouds.

14. Retro 70s Groovy Swirls & Checkerboard

Design Meaning & Aesthetic Essence

Funky, bold, and energetic, this 1970s-inspired aesthetic merges wavy psychedelic ribbons with distorted checkerboard grids in an iconic warm retro color palette.

Materials Needed

  • Mustard yellow, burnt rust orange, chocolate brown, avocado green, and warm cream paints
  • Flat square shader brush (1/4″) and round liner brush
  • Semi-gloss or high-gloss protective clear coat

Step-by-Step Execution

  1. Grid Distortion: Lightly sketch a flowing, distorted ribbon or melting wave structure across the belly of the vessel.
  2. Warped Checkerboard: Paint an alternating warm cream and chocolate brown checkerboard pattern inside the warped ribbon shape.
  3. Groovy Rainbow Borders: Paint parallel, flowing outline stripes along the contours of the checkerboard using burnt orange, avocado green, and mustard.
  4. Solid Color Fields: Fill surrounding open ceramic areas with rich, warm rust or avocado solid blocks.
  5. Refining Edges: Trace thin cream contour lines between competing color blocks to maintain retro pop clarity.

Studio Tips & Creative Variations

  • Tip: Keep your checkerboard squares proportional as the ribbon twists—narrow them at the curves and widen them along the outer crests.
  • Variation (Pastel Groovy): Execute the same 70s wavy checkerboard pattern in lavender, mint green, butter yellow, and strawberry cream.
  • Variation (Smiley Flower Fusion): Add 70s-style daisy flowers with happy center faces inside open solid zones.

15. Ethereal Watercolor Wash & Inky Splatter

Design Meaning & Aesthetic Essence

Embracing fluidity, transparency, and spontaneous organic motion, this technique mimics watercolor washes and flowing alcohol ink pools on ceramic surfaces, completed with energetic calligraphic paint splatters.

Materials Needed

  • Ceramic flow underglazes or fluid acrylics mixed with flow medium
  • Large round mop brush and fan brush
  • Stiff bristle splatter brush
  • High-gloss clear sealant

Step-by-Step Execution

  1. Hydrated Ground: Lightly dampen the clean ceramic surface with a wet sponge to promote smooth color dispersion.
  2. Fluid Color Bleeds: Drop highly diluted teal, rose, and soft amethyst washes onto the top rim, letting gravity pull the pigments down in organic drips.
  3. Edge Feathering: Use a clean, damp mop brush to feather out the drip edges into soft, smoky translucent watercolor pools.
  4. Negative Space: Leave at least 40% of the natural white ceramic base unpainted to balance the fluidity.
  5. Controlled Splatter: Dip a stiff bristle brush in rich charcoal or metallic gold paint and flick fine, energetic stardust splatters across the wash boundaries.

Studio Tips & Creative Variations

  • Tip: Use a straw or gentle air blower to steer the flowing liquid color droplets along intentional curving paths around the vessel.
  • Variation (Monochrome Ink Stone): Use only deep sumi ink / black ceramic washes for a Zen Japanese ink-wash painting aesthetic.
  • Variation (Gilded Edge Drips): Paint metallic gold borders along the bottom tips of each dry watercolor drip line.
See also  10 DIY Terracotta Pot Painting Ideas

16. Scandinavian Folk Art (Kurbits & Forest Motifs)

Design Meaning & Aesthetic Essence

Rooted in Nordic folklore and traditional Swedish kurbits decorative painting, this design uses stylized symmetrical flora, playful horses, birds, and decorative teardrop flourishes on earthy pottery.

Materials Needed

  • Swedish blue, vibrant paprika red, olive green, warm ochre, and off-white paints
  • Pointed round brushes (#2, #4) and fine detail rigger
  • Matte or low-satin protective glaze

Step-by-Step Execution

  1. Central Symmetry Line: Mark a faint vertical center line down the primary face of the ceramic vessel.
  2. Folk Animal Silhouette: Paint a stylized Dala horse or Nordic songbird centered on the piece in solid paprika red or royal blue.
  3. Decorative Flora: Surround the central subject with sweeping symmetrical leafy vines, stylized tulip blossoms, and fan-shaped fantasy flowers.
  4. Teardrop Flourishes: Paint decorative teardrop clusters (kurbits strokes) bridging the gaps between flower heads and stems.
  5. Inner Detailing: Paint crisp white and ochre geometric lines, dots, and scallops inside the solid body of the central animal and floral motifs.

Studio Tips & Creative Variations

  • Tip: Execute teardrop strokes by firmly pressing down on the belly of the round brush, then lifting smoothly as you pull outward to the tip.
  • Variation (Monochrome White Folk Art): Paint intricate Scandinavian folk flourishes in pure crisp white over raw unglazed red terracotta.
  • Variation (Winter Nordic): Shift colors to ice blue, slate grey, and crisp white featuring reindeer and evergreen tree geometry.

17. Vibrant Tropical Botanical Paradise

Design Meaning & Aesthetic Essence

A bold, immersive celebration of rainforest lushness, featuring overlapping monstera leaves, broad banana palm fronds, bird of paradise flowers, and vibrant pops of exotic color on ceramic vessels.

Materials Needed

  • Emerald green, deep jungle green, chartreuse, vibrant magenta, bright orange, and golden yellow paints
  • Flat angled brush and round detail brush
  • Gloss finish to reflect tropical humidity

Step-by-Step Execution

  1. Deep Background: Coat the pottery in a deep midnight navy, rich charcoal, or leave it as clean stark white for high-contrast drama.
  2. Large Leaf Blocking: Paint oversized Monstera deliciosa leaves with characteristic cutouts and splits using deep jungle green.
  3. Layered Palm Fronds: Layer wide banana palm leaves behind and around the monstera shapes in lighter emerald and lime tones.
  4. Tropical Blooms: Paint an exotic Bird of Paradise flower or vibrant magenta hibiscus blossoming out from between the foliage layers.
  5. Leaf Ribs & Veins: Paint bright chartreuse and lime-green central veins down the length of every leaf for clean graphic definition.

Studio Tips & Creative Variations

  • Tip: Paint the background foliage in darker, cooler tones and the foreground leaves in warmer, vibrant greens to create realistic optical depth.
  • Variation (Pink Jungle): Pair emerald jungle leaves with a soft millennial blush-pink background.
  • Variation (Toucan Accent): Paint a colorful keel-billed toucan perched quietly on one of the central monstera leaves.

18. Minimalist Line Art Faces & Continuous Contour

Design Meaning & Aesthetic Essence

Heavily influenced by Picasso and Matisse continuous line drawings, this modern minimalist design uses a single unbroken line to trace expressive human profiles, embracing effortless sophistication.

Materials Needed

  • Jet black or deep espresso ceramic underglaze / enamel paint
  • Long-haired script liner brush (size #0 or #1)
  • Soft beige, terracotta, and ochre paints (for background color pads)
  • Matte stone ceramic finish

Step-by-Step Execution

  1. Raw Canvas: Ensure the pottery has a smooth matte stoneware, off-white, or raw bisqueware finish.
  2. Organic Color Pads: Paint soft, asymmetrical, abstract watercolor-like shapes in muted blush, sand, and terracotta on the ceramic body.
  3. Continuous Line Sketch: Plan a continuous line face profile with pencil—flowing smoothly from forehead, down the nose, across the lips, jawline, and neck.
  4. Brush Execution: Paint the single continuous line with steady, consistent brush pressure using a loaded script liner brush.
  5. Minimalist Details: Add a single delicate leaf sprig or simple eye contour line alongside the main continuous face.

Studio Tips & Creative Variations

  • Tip: Keep the paint consistency fluid like light cream so the liner brush glides effortlessly across the clay without dragging.
  • Variation (Dual Interlocking Profiles): Paint two abstract profiles facing one another whose continuous lines interlock across the curves of the pot.
  • Variation (White on Charcoal): Paint crisp, fine white line art over an ultra-matte charcoal-painted ceramic vessel.

19. French Lavender Fields & Provence Bees

Design Meaning & Aesthetic Essence

Evoking the rustic tranquility of the French countryside, this aesthetic combines delicate sprigs of purple lavender, soft silver-green foliage, and detailed honeybees on rustic, textured ceramic tableware.

Materials Needed

  • Deep violet, soft lilac, amethyst, olive green, warm ochre, charcoal, and metallic gold paint
  • Fan brush and fine pointed detail liner
  • Satin clear ceramic topcoat

Step-by-Step Execution

  1. Rustic Base: Apply an antique linen or soft chalky white wash across the ceramic piece.
  2. Slender Stems: Paint long, delicate, sweeping stem lines grouped in gentle bundles using olive green.
  3. Lavender Buds: Using the tip of a fine detail brush or a fan brush, dab small textured clusters of deep violet, amethyst, and soft lilac dots along each stem.
  4. Foliage Base: Add slender, silver-green needle-like leaves branching out at the base of the lavender stems.
  5. Detailed Honeybees: Paint small golden honeybees buzzing near the lavender sprigs, complete with delicate, translucent off-white wings and black striped abdomens.

Studio Tips & Creative Variations

  • Tip: Layer dark purple buds first, then top them with light lilac and pure white dabs while drying to build realistic flower texture.
  • Variation (Lavender Wreath): Paint the lavender stems gathered into a circular botanical wreath around the rim of ceramic plates or bowls.
  • Variation (Monochrome Lilac): Paint the entire botanical study using varying intensities of soft purple alone.

20. Gilded Celestial Zodiac & Moonlit Constellations

Design Meaning & Aesthetic Essence

A luxurious tribute to astrological charting, this concept pairs rich midnight matte backgrounds with shining liquid gold zodiac signs, intricate planetary orbits, and delicate star clusters.

Materials Needed

  • Matte jet black or deep obsidian blue paint
  • High-metallic liquid gold enamel or ceramic gold luster
  • Fine mechanical pencil
  • Ultra-fine detail liner brush (#00)
  • Matte base coat with high-gloss gold accents

Step-by-Step Execution

  1. Night Sky Foundation: Apply an opaque, velvety coat of matte obsidian black or night sky blue across the entire pottery piece.
  2. Astrological Grid: Lightly trace fine orbital rings and concentric celestial latitude lines around the vessel with a soft pencil.
  3. Zodiac Glyphs: Paint elegant, minimalist zodiac symbols (Aries, Taurus, Gemini, etc.) evenly spaced along the central orbital band in bright liquid gold.
  4. Constellation Maps: Connect delicate star groupings with ultra-thin gold lines, placing brighter, larger gold dots at major star vertices.
  5. Star Mist: Stipple tiny, subtle micro-dots of gold along the cosmic band to give the illusion of distant shimmering starlight.

Studio Tips & Creative Variations

  • Tip: Use a rotating turntable to keep concentric planetary orbit lines continuous, smooth, and uniform around the circumference.
  • Variation (Personalized Single Zodiac): Focus on a single prominent astrological constellation and glyph on the front of a custom mug or vase.
  • Variation (Sun & Moon Dial): Paint a large radiant golden sun on one face of the vessel and an intricate crescent moon on the reverse.