Spread the love

The architectural arch is one of the most enduring and captivating design elements in interior history. Tracing its roots back through ancient Roman engineering, Mediterranean villas, and Moorish palaces, the graceful curve of an arch brings an instant sense of softness, organic flow, and architectural grandeur to modern spaces. In contemporary interior design, arches have experienced a massive renaissance, moving away from rigid, boxy lines toward fluid, welcoming silhouettes.

Whether you want to make a dramatic structural statement, carve out an intimate functional nook, or introduce subtle sculptural elegance through furniture and accents, this comprehensive guide explores 20 exquisite arch decor ideas. Each concept includes a detailed introduction, an exploration of its design philosophy, step-by-step guidance on how to make it, essential tips and variations, and the exact materials you will need. At the conclusion of this article, you will find a curated collection of high-resolution visual prompts designed to inspire your next home renovation or styling project.

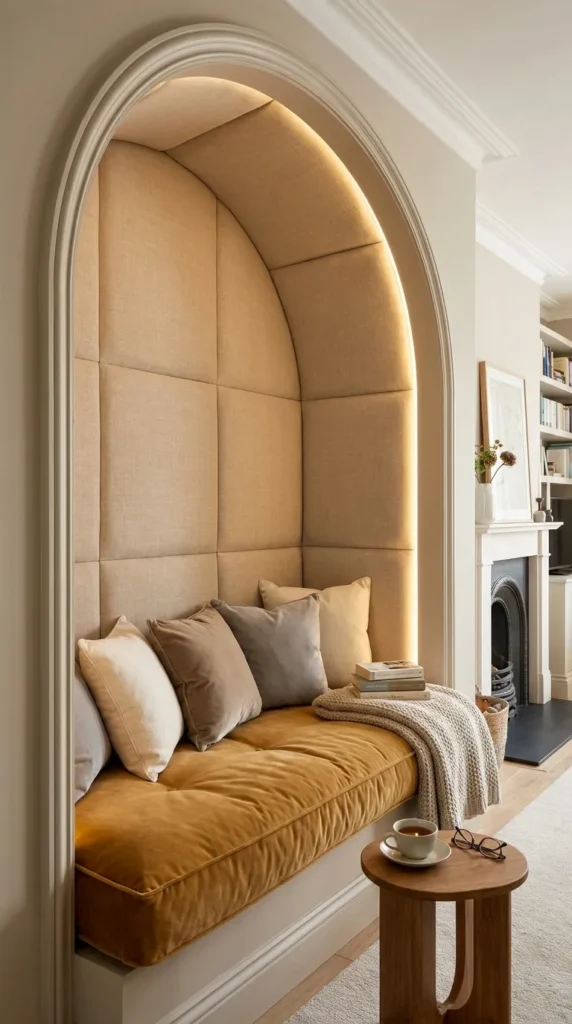
1. Faux Drywall Architectural Archway

Introduction

Transforming a standard rectangular doorway into a graceful, sweeping archway is one of the most impactful ways to redefine the floor plan of a home. A faux drywall archway softens transitions between rooms and adds instant structural character without major demolition.

What This Idea Means

This concept celebrates architectural fluidity and seamless spatial flow. It replaces sharp 90-degree angles with organic, welcoming curves, creating visual continuity and a bespoke custom-built feel throughout the home.

How to Make It

  1. Measurement and Template: Measure the width of your existing doorway and cut two matching semi-circular templates out of thick plywood or MDF to match your desired arch radius.
  2. Framing Support: Screw 2×4 lumber framing blocks into the upper corners of the doorway to anchor your plywood curves securely on both sides of the wall.
  3. Flexible Drywall Installation: Bend a strip of flexible 1/4-inch drywall or bendable MDF around the curved wooden framework, fastening it tightly with drywall screws.
  4. Taping and Mudding: Apply corner bead specifically designed for curves, then tape, mud, and sand the joints multiple times until the curve is completely smooth and flush with the surrounding wall.

Tips and Variations

  • Tip: Lightly mist flexible drywall with water before bending it to prevent snapping and make it easier to mold around tight curves.
  • Variation: Leave the interior soffit of the arch exposed wood while painting the surrounding walls a crisp contrast color.

Needs to Make That Thing

  • Plywood or MDF for arch templates
  • 2×4 framing lumber and wood screws
  • 1/4-inch flexible drywall sheet
  • Curved drywall corner bead, joint compound, and sandpaper

2. Fluted Wood Accent Wall Arch Niche

Introduction

A recessed wall niche framed by a soft arch and lined with intricate fluted wood paneling creates a breathtaking focal point. Perfect for displaying ceramic vases, sculptures, or curated art pieces, this feature adds texture and depth to flat walls.

What This Idea Means

This design focuses on tactile layering, shadow play, and shadowbox curation. It turns an empty stretch of wall into an art gallery display that catches shifting light throughout the day.

How to Make It

  1. Tracing the Arch: Draw your desired arch outline directly onto the drywall using a pencil attached to a string compass.
  2. Recessing the Niche: Carefully cut out the drywall along your pencil line and build a shallow wooden box frame inside the wall cavity to create depth.
  3. Installing Fluted Panels: Cut half-round wood fluted molding panels to fit the back and curved top of the niche, securing them with construction adhesive and brad nails.
  4. Trim and Finish: Frame the outer perimeter of the arch with matching thin wood molding, then paint or stain the entire niche in a rich, cohesive color.

Tips and Variations

  • Tip: Install a tiny, battery-operated recessed puck light or warm LED strip at the top of the niche to cast a dramatic downward glow over your displayed objects.
  • Variation: Paint the interior of the fluted niche in a contrasting terracotta or olive green while keeping the outer wall warm white.

Needs to Make That Thing

  • Drywall saw and pencil compass
  • Fluted wood tambour panels or half-round molding strips
  • Construction adhesive and brad nail gun
  • Wood stain or matte interior paint

3. Arched Built-In Bookshelves

Introduction

Flanking a fireplace or framing a living room wall with custom arched built-in bookshelves combines practical library storage with stunning architectural curves. It transforms a standard shelving unit into a bespoke heirloom feature.

What This Idea Means

This concept embraces academic comfort, functional elegance, and tailored craftsmanship. It softens the rigidity of traditional square shelving with welcoming organic lines.

How to Make It

  1. Cabinet Base Construction: Build or purchase lower base cabinets with solid doors to house concealed storage, anchoring them securely to the wall studs.
  2. Building Upper Shelves: Construct upper open shelving units using high-grade plywood, customizing shelf spacing to accommodate books of all heights.
  3. Creating the Arched Tops: Cut custom arched fascia boards out of MDF to cap the top of each bookshelf opening, aligning them with uniform height.
  4. Seamless Painting: Caulk all seams, prime the entire unit, and spray-paint or roll it in a rich, saturated satin cabinet paint for a flawless factory finish.

Tips and Variations

  • Tip: Back the interior of the arched bookshelves with grasscloth wallpaper or beadboard paneling for hidden texture and pattern depth.
  • Variation: Design a hidden arched doorway disguised as a bookshelf that opens into a secret pantry or reading room.

Needs to Make That Thing

  • Cabinet-grade plywood and MDF boards
  • Table saw, jigsaw, and brad nailer
  • Primer and high-durability cabinet paint
  • Grasscloth wallpaper (optional backing)

4. Limewashed Arched Accent Wall

Introduction

A grand arched accent wall finished in textured mineral limewash paint creates an instant Mediterranean villa vibe in a modern bedroom or living room. The chalky, cloud-like texture mimics old-world European plaster.

What This Idea Means

This design celebrates raw mineral textures, wabi-sabi imperfection, and tactile warmth. It adds organic movement and earthy sophistication to flat painted surfaces.

How to Make It

  1. Mapping the Arch: Use a chalk line and pencil compass to draw a large, dramatic arch on your bedroom headboard wall, extending from floor to ceiling.
  2. Primer Application: Apply a mineral-friendly primer sealer inside the arched perimeter to ensure proper adhesion for the limewash paint.
  3. Applying Limewash: Using a specialized flat limewash brush, apply the natural lime paint in crisscross, sweeping “X” strokes to build up cloudy, mottled texture.
  4. Second Coat and Buffing: Apply a second coat while the first is slightly tacky, varying your brushstrokes to enhance the dimensional stone-like movement.

Tips and Variations

  • Tip: Practice your crisscross brush technique on a spare piece of drywall before tackling the main wall to get a feel for the mineral paint movement.
  • Variation: Paint a contrasting smaller arch inside the large limewash arch for a modern geometric layered effect.

Needs to Make That Thing

  • Natural mineral limewash paint in warm stone or clay tones
  • Specialized limewash block brush
  • Chalk line, pencil, and string compass
  • Painter’s tape and drop cloths

5. Arched Full-Length Leaner Mirror

Introduction

An oversized full-length mirror featuring a graceful arched top is a staple of elegant interior styling. Leaning it casually against a bedroom or entryway wall bounces natural light around the room while adding sophisticated height.

See also  Luxury Inspiring 20 Small Bathroom Decor Ideas

What This Idea Means

This concept focuses on spatial expansion, reflective light enhancement, and effortless styling. It tricks the eye into perceiving higher ceilings and larger room volumes.

How to Make It

  1. Selecting or Framing: Purchase an oversized mirror base or build a custom wooden frame featuring a sweeping arched top header.
  2. Adding Metallic or Wood Trim: Wrap the frame in hammered brass sheeting, or rout wooden molding to create a fluted texture along the curved frame edge.
  3. Safety Backing: Ensure the mirror glass features a shatterproof safety backing film for secure leaning against walls.
  4. Placement and Anchoring: Lean the heavy mirror securely against a wall stud, anchoring the top frame bracket discreetly to the wall to prevent tipping.

Tips and Variations

  • Tip: Position your arched leaner mirror directly opposite a window to maximize natural light reflection and brighten dark corners.
  • Variation: Hang a collection of three smaller arched mirrors side by side on a wall to mimic a grand arched window grid.

Needs to Make That Thing

  • Oversized full-length mirror with arched wooden or metal frame
  • Heavy-duty wall anti-tip anchor bracket
  • Glass cleaner and microfiber polishing cloth

6. Molded Plaster Arch Over a Kitchen Pass-Through

Introduction

Replacing a standard rectangular kitchen pass-through or breakfast bar opening with a smoothly curved plaster arch brings cottagecore charm and architectural polish to an open-concept kitchen.

What This Idea Means

This design philosophy bridges functional room zoning with organic sculptural art. It turns a utility opening into a charming focal portal connecting kitchen and dining zones.

How to Make It

  1. Framing the Opening: Modify the upper kitchen pass-through framing with curved plywood ribs to establish the desired arch radius.
  2. Plaster Mesh Application: Staple galvanized metal lath mesh across the curved frame to provide a strong structural key for plaster adhesion.
  3. Applying Venetian Plaster: Trowel layers of Venetian plaster or joint compound over the mesh, smoothing it with a Japanese steel trowel to achieve a velvety matte finish.
  4. Edge Sealing: Seal the finished plaster arch with a matte breathable wax or sealer to protect against kitchen moisture and grease.

Tips and Variations

  • Tip: Leave the plaster finish slightly hand-troweled and organic rather than machine-flat to highlight artisanal craftsmanship.
  • Variation: Hang a pair of sleek brass pendant lights inside the arched pass-through opening for focused dining bar illumination.

Needs to Make That Thing

  • Plywood framing scraps and metal lath mesh
  • Venetian plaster mix or heavy-duty joint compound
  • Japanese steel plastering trowels
  • Matte protective wax sealer

7. Arched Headboard with Integrated LED Backlighting

Introduction

An upholstered or wooden arched headboard featuring a concealed halo of warm LED backlighting creates a dreamy, hotel-luxury aesthetic in the master bedroom, anchoring the bed with soft architectural radiance.

What This Idea Means

This concept prioritizes sanctuary styling, soft nocturnal illumination, and tailored comfort. It frames the bed like a sacred altar of rest and relaxation.

How to Make It

  1. Cutting the Arch: Cut a tall, elegant floor-standing headboard panel out of heavy MDF board featuring a sweeping symmetrical arch at the top.
  2. Upholstering: Layer high-density foam and wrap the MDF panel in heavy textured boucle, linen, or velvet fabric, stapling the edges cleanly to the back.
  3. Mounting Standoff Blocks: Screw wooden spacer blocks to the back of the headboard to create a 1-inch gap between the headboard panel and the wall.
  4. Installing LED Strips: Affix flexible warm-white LED strip lighting around the recessed perimeter of the back frame so light spills outward against the wall.

Tips and Variations

  • Tip: Connect your headboard LED backlights to a smart dimmer switch or bedside touch sensor for effortless evening mood lighting.
  • Variation: Combine vertical fluted wood panels with an upholstered arched central insert for mixed-media texture.

Needs to Make That Thing

  • Large MDF board sheet and jigsaw
  • High-density upholstery foam and durable fabric (boucle or linen)
  • Staple gun and wooden standoff spacers
  • Flexible warm-white LED strip lighting kit with dimmer

8. Tile-Wrapped Arched Shower Niche

Introduction

Elevate bathroom luxury by replacing standard square shower storage boxes with a custom arched shower niche. Wrapped in exquisite zellige or marble mosaic tiles, it transforms a functional necessity into a spa-like artwork.

What This Idea Means

This design celebrates hidden luxury, waterproof engineering, and meticulous tile craftsmanship. It replaces utilitarian plastic caddies with seamless, beautiful architectural storage.

How to Make It

  1. Framing the Niche: Build a waterproof foam shower niche insert featuring a factory-made or custom-carved arched top header between wall studs.
  2. Waterproofing: Apply liquid waterproofing membrane (such as RedGard) meticulously across all corners and seams of the niche to ensure 100% leak-proof integrity.
  3. Tile Cutting: Carefully cut small zellige tiles or mosaic sheets to follow the sweeping curve of the arch header using a wet tile saw and nippers.
  4. Grouting: Grout the niche with a matching epoxy or high-performance grout, sealing the corners with mildew-resistant silicone.

Tips and Variations

  • Tip: Install a waterproof mini LED pot light inside the top curve of the arched shower niche to illuminate your bath products like museum artifacts.
  • Variation: Line the back of the arched shower niche in contrasting iridescent mother-of-pearl mosaic tiles for a shimmering water-like effect.

Needs to Make That Thing

  • Waterproof foam niche insert with arched top
  • Liquid waterproofing membrane and brush
  • Zellige or marble mosaic tiles and thin-set mortar
  • Wet tile saw and tile nippers

9. Arched Glass Interior Partition Doors

Introduction

Arched steel-framed glass interior doors (often called Crittall-style doors) bring industrial loft luxury and exceptional architectural drama while maintaining acoustic separation and light flow between rooms.

What This Idea Means

This concept focuses on transparent zoning, industrial elegance, and light transmission. It frames doorways like monumental windows, connecting spaces without sacrificing privacy.

How to Make It

  1. Accurate Opening Measurement: Measure your finished drywall door opening with laser precision, accounting for custom steel frame fabrication tolerances.
  2. Custom Steel Fabrication: Partner with a metal fabricator to weld heavy-duty steel tubing into an arched door frame and interior grid muntins, finished in matte black powder coat.
  3. Installing Glass Panels: Secure tempered safety glass panes into the steel grid channels using structural glazing tape and silicone sealant.
  4. Hanging and Hardware: Mount the heavy arched glass door using heavy-duty pivot hinges and a minimalist modern pull handle.

Tips and Variations

  • Tip: Use reeded or fluted textured glass instead of clear glass if you want to obscure views into a home office or pantry while maintaining light glow.
  • Variation: Install arched glass double doors leading from a living room out to a sunroom or courtyard.

Needs to Make That Thing

  • Custom fabricated arched steel-frame glass door
  • Tempered safety glass panes and glazing tape
  • Heavy-duty pivot hinges and door handle hardware
  • Laser level and masonry anchors

10. Freestanding Arched Display Cabinet

Introduction

A freestanding curio cabinet or vitrine featuring sweeping arched glass doors brings old-world apothecary charm into a modern dining room or living space, creating a gorgeous display case for heirloom dishware.

What This Idea Means

This design honors heritage display culture and refined curation. It protects cherished objects behind gorgeous curved glass panes while adding vertical elegance to empty wall corners.

See also  22 Bedroom Master All White Ideas

How to Make It

  1. Selecting the Cabinet: Source a solid hardwood cabinet (such as white oak or walnut) featuring soaring glass doors with arched top wooden frames.
  2. Interior Styling: Line the interior back panel of the cabinet with antique mirror glass or woven cane webbing for rich textural backdrop contrast.
  3. Lighting Upgrades: Install discrete battery-operated LED cabinet spotlights on the upper interior ceiling of the cabinet.
  4. Curated Arrangement: Arrange fine china, crystal glassware, and vintage books with generous negative space between items to maintain an airy aesthetic.

Tips and Variations

  • Tip: Place small brass picture lights or plate stands inside the cabinet to display special heirloom platters vertically.
  • Variation: Paint the exterior of a vintage wooden cabinet in a moody olive green or charcoal while leaving the interior natural wood grain.

Needs to Make That Thing

  • Solid hardwood arched glass display cabinet
  • Optional antique mirror backing or cane webbing
  • Battery-operated LED cabinet puck lights
  • Glass cleaner and microfiber cloths

11. Woven Rattan Arched Headboard

Introduction

Infusing coastal warmth and natural texture into the bedroom, a woven rattan or cane-webbed arched headboard brings breezy, organic elegance reminiscent of a luxury tropical resort.

What This Idea Means

This concept celebrates biophilic design, natural fibers, and relaxed bohemian luxury. It softens bedroom acoustics and introduces rich, tactile pattern play.

How to Make It

  1. Constructing the Frame: Build a solid rattan or bentwood outer frame featuring a sweeping arched top header.
  2. Applying Cane Webbing: Soak natural rattan cane webbing in warm water for 30 minutes to make it pliable, then stretch and staple it tightly across the interior frame opening.
  3. Securing Spline: Press a matching reed spline into the groove around the cane webbing edge with wood glue to lock the woven panel permanently in place.
  4. Sealing: Apply a clear matte protective lacquer to the rattan to protect against dust and humidity while preserving its natural golden hue.

Tips and Variations

  • Tip: Pair your rattan arched headboard with crisp white linen bedding and raw jute floor rugs for an effortless coastal sanctuary feel.
  • Variation: Paint the rattan frame in a chic matte black or soft sage green for a modern twist on a classic tropical material.

Needs to Make That Thing

  • Solid rattan framing poles and bending tools
  • Natural open-mesh rattan cane webbing and spline
  • Wood glue, heavy-duty stapler, and utility knife
  • Clear matte protective spray lacquer

12. Arched Fireplace Mantel Surround

Introduction

The fireplace is the traditional heart of the home. Framing your fireplace firebox and wooden mantel with a sweeping structural arch creates an instant historic European hearth feel.

What This Idea Means

This design concept honors monumental hearth architecture and sculptural minimalism. It replaces standard rectangular brick fireplace openings with a soft, inviting architectural portal.

How to Make It

  1. Building the Hearth Form: Construct a heavy timber or metal-stud framing armature around your existing fireplace insert in a graceful arched silhouette.
  2. Applying Plaster or Stone: Cover the arched framework with cement backer board, then finish it with seamless microcement, smooth plaster, or natural limestone blocks.
  3. Floating Mantel: Install a thick, hand-hewn reclaimed timber beam or a matching curved stone mantel ledge intersecting the arch base.
  4. Hearth Styling: Style the firebox with a minimalist black iron screen and stack Birch logs neatly on the hearth floor.

Tips and Variations

  • Tip: Ensure all surrounding materials comply with local building codes regarding clearance requirements for heat from the fireplace insert.
  • Variation: Paint the microcement fireplace arch in a warm chalky travertine color to anchor a neutral minimalist living room.

Needs to Make That Thing

  • Metal framing studs and cement backer board
  • Microcement finish kit or natural limestone veneer
  • Reclaimed timber mantel beam
  • Heavy-duty masonry fasteners and construction adhesive

13. Painted Ombre Arched Wall Mural

Introduction

Playful, artistic, and visually captivating, a painted ombre arched wall mural combines the structural elegance of an arch with a dreamy, multi-colored gradient fade.

What This Idea Means

This concept celebrates color exploration, artistic expression, and optical illusion. It acts as an affordable, high-impact alternative to traditional wallpaper or expensive artwork.

How to Make It

  1. Drawing the Arch: Map out a tall, slender arch on your dining room or entryway wall using a chalk string compass.
  2. Selecting Gradient Hues: Choose three harmonious paint colors that fade from deep terracotta at the base through dusty peach to soft cream at the arch peak.
  3. Blocking and Blending: Paint each horizontal band of color inside the arch, then use a wide dry brush or damp sponge while the paint is wet to feather and blend the lines seamlessly.
  4. Crisp Outer Edge: Touch up the outer pencil line with your base wall paint using an artist brush for a razor-sharp silhouette edge.

Tips and Variations

  • Tip: Use a slow-drying paint medium additive to keep the interior gradient workable longer, allowing for a buttery-smooth ombre fade.
  • Variation: Paint multiple intersecting arches of varying heights and widths to create a dynamic modern geometric gallery wall.

Needs to Make That Thing

  • Interior wall paints in 3 gradient color shades
  • Roller brushes, wide feathering blending brushes
  • String compass, chalk line, and painter’s tape
  • Artist detail brush for crisp borders

14. Arched Canopy Daybed Nook

Introduction

Carve out a cozy reading retreat by building an arched wall recess or canopy frame fitted with a plush daybed, creating a womb-like architectural sanctuary for afternoon daydreams.

What This Idea Means

This design prioritizes cocooning comfort, psychological safety, and micro-architecture. It carves out a dedicated, intimate escape zone within an open-plan home.

How to Make It

  1. Recessing or Framing: Construct a deep wall alcove featuring an arched top opening, or build a freestanding canopy frame that curves gracefully over a twin daybed.
  2. Upholstered Interior: Line the interior walls of the arched nook in soft acoustic felt or quilted linen panels for sound dampening and tactile comfort.
  3. Daybed Styling: Fill the nook with a comfortable mattress, an abundance of feather throw pillows, and heavy velvet floor cushions.
  4. Reading Light: Install a dedicated wall-mounted swing-arm reading sconce inside the arch ceiling.

Tips and Variations

  • Tip: Hang a sheer linen curtain across the front of the arched daybed nook that can be drawn closed for complete privacy.
  • Variation: Build storage drawers directly into the wooden platform beneath the daybed mattress for hidden blanket storage.

Needs to Make That Thing

  • Framing lumber, plywood, and drywall for alcove construction
  • Quilted wall upholstery panels or acoustic felt
  • Twin daybed mattress and plush decorative pillows
  • Wall-mounted reading sconce

15. Fluted Marble Arched Coffee Table Centerpiece

Introduction

Bring architectural curves to your living room furniture arrangement with a sculptural coffee table featuring solid fluted marble pedestals supporting an arched or oval glass top.

What This Idea Means

This concept focuses on sculptural furniture art, heavy mineral textures, and tactile contrast. It grounds the living room seating arrangement with organic, high-end materials.

How to Make It

  1. Selecting the Base: Source two solid marble pedestals carved with vertical fluted channels for architectural relief.
  2. Custom Tabletop: Order a custom thick tempered glass or solid travertine tabletop cut in a gentle pill or arched oval silhouette.
  3. Assembly and Weight Distribution: Place the heavy marble bases securely on a flat rug, resting the glass top evenly across silicone bumper pads on the pedestals.
  4. Styling: Style the coffee table with a heavy ceramic art book, a travertine candleholder, and a sculptural bronze bowl.
See also  20 DIY Rustic Farmhouse Small Room

Tips and Variations

  • Tip: Apply a penetrating stone sealer to marble pedestals to protect against red wine or coffee spills.
  • Variation: Pair a fluted travertine base with a rich walnut wood arched tabletop for mixed-material warmth.

Needs to Make That Thing

  • Solid fluted marble or travertine pedestals
  • Custom-cut thick tempered glass or stone tabletop
  • Clear silicone protective bumper pads
  • Stone impregnating sealer

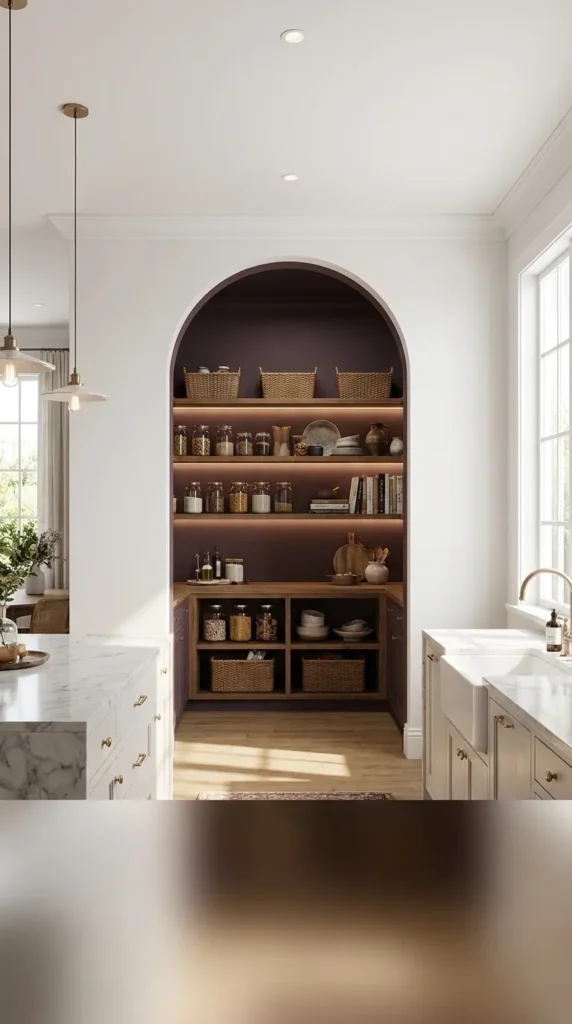
16. Arched Open Kitchen Pantry Doorway

Introduction

Ditch standard swinging doors in favor of a grand open arched doorway leading into a walk-in butler’s pantry. It adds old-world European charm and allows easy, unobstructed access while cooking.

What This Idea Means

This design celebrates pantry elegance, accessibility, and architectural framing. It turns a utilitarian storage space into a stylish extension of the kitchen design.

How to Make It

  1. Opening Expansion: Open up the drywall framing of your pantry entrance to create a generous, tall arched portal.
  2. Trim and Casing: Install custom-milled wooden arch casings or smooth drywall return corners that curve gracefully into the pantry interior.
  3. Pantry Interior Preview: Ensure the pantry interior features matching open shelving and organized storage containers, as the arched doorway puts it entirely on display.
  4. Optional Flap Door: If partial privacy is desired, hang a cafe-style arched louvered wooden gate or a heavy linen curtain inside the arch.

Tips and Variations

  • Tip: Paint the interior pantry walls in a moody, unexpected color (like deep emerald or plum) to create a striking contrast when viewed through the white arched doorway.
  • Variation: Install a decorative antique brass sign reading “Pantry” mounted on the wall just above the apex of the arch.

Needs to Make That Thing

  • Drywall, framing studs, and curved corner bead
  • Custom wooden arch molding or smooth plaster returns
  • Interior pantry shelving and storage containers
  • Optional linen curtain rod and fabric panel

17. Cane-Webbed Arched Cabinet Doors

Introduction

Upgrade a plain sideboard, media console, or kitchen cabinet by replacing flat wooden cabinet door panels with intricate cane webbing framed inside elegant wooden arches.

What This Idea Means

This concept honors DIY furniture flipping, retro revival, and textural lightness. It transforms ordinary flat-pack furniture into bespoke, high-end designer pieces.

How to Make It

  1. Modifying Doors: Remove existing cabinet door center panels using a jigsaw, leaving a sturdy outer wooden door frame.
  2. Routing Arched Inserts: Cut a matching arched opening into a thin wooden overlay board or rout a groove into the door frame to accept cane webbing.
  3. Soaking Cane: Soak natural woven cane webbing in warm water for 30 minutes to make it pliable and stretch-resistant.
  4. Stapling and Spline: Staple the wet cane tightly across the arched door frame, secure with spline, let dry until drum-tight, and reattach doors to hinges.

Tips and Variations

  • Tip: Spray the dried cane webbing lightly with water after installation; as it dries, it pulls ultra-tight without sagging.
  • Variation: Paint the cabinet body in soft cream and leave the arched cane doors in their natural warm honey tone.

Needs to Make That Thing

  • Existing cabinet doors and jigsaw
  • Natural open-mesh cane webbing roll
  • Heavy-duty staple gun and wood glue
  • Sandpaper and cabinet paint

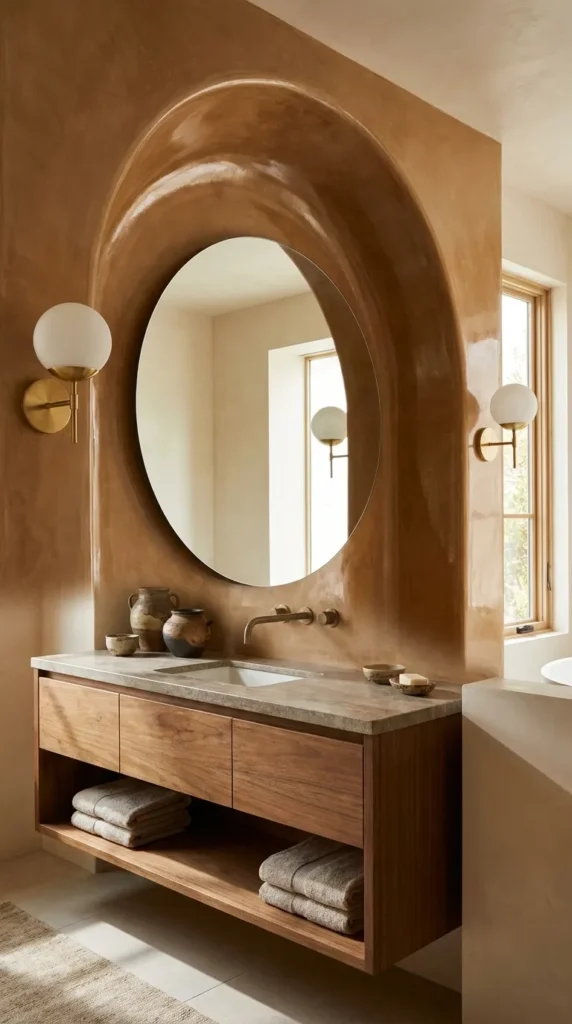
18. Textured Venetian Plaster Arched Bathroom Vanity Mirror

Introduction

A bathroom vanity mirror recessed directly into a thick, textured Venetian plaster arch creates an unforgettable custom spa aesthetic, blending seamlessly into the surrounding wall.

What This Idea Means

This design focuses on seamless wall integration, organic plastercraft, and luxury hotel styling. It eliminates boxy framed mirrors in favor of a fluid, built-in mirror portal.

How to Make It

  1. Framing the Mirror Niche: Recess a custom-shaped mirror directly into the wall studs during bathroom construction or renovation.
  2. Plaster Build-Up: Build up thick layers of Venetian plaster around the mirror edges, sculpting a smooth, sweeping arch that frames the glass seamlessly.
  3. Polishing and Waxing: Burnish the plaster with a steel trowel to achieve a polished marble sheen, then seal it with waterproof wax.
  4. Vanity Lighting: Flank the arched plaster vanity mirror with sleek, modern globe wall sconces.

Tips and Variations

  • Tip: Ensure the Venetian plaster is thoroughly sealed with a waterproof wax coating to withstand high bathroom humidity and water splashes.
  • Variation: Tint the Venetian plaster in a soft, sandy beige to warm up a cool white bathroom tile scheme.

Needs to Make That Thing

  • Custom-cut frameless mirror glass
  • Venetian plaster mix and burnishing trowels
  • Waterproof finishing wax
  • Flanking wall sconces and mounting hardware

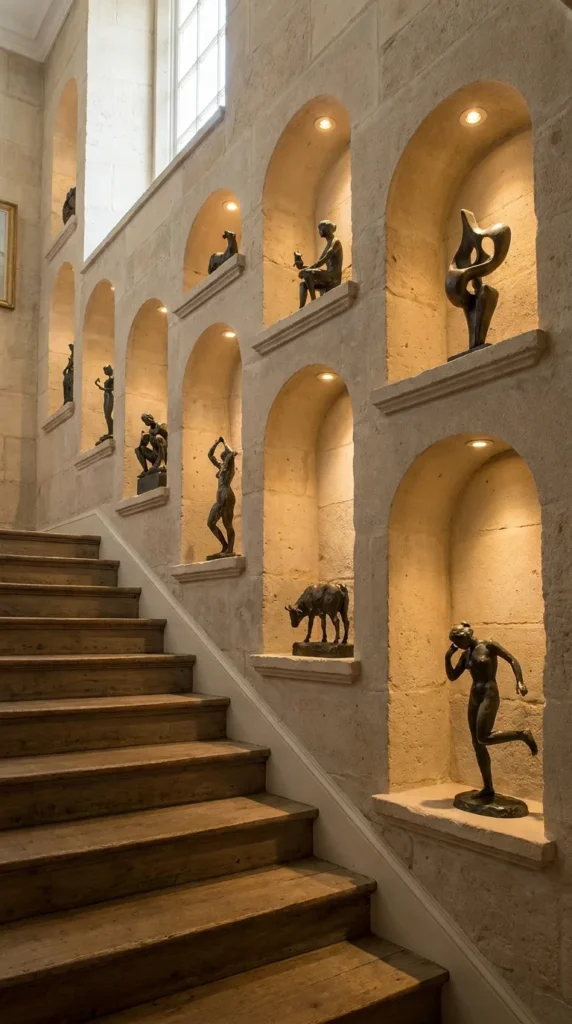
19. Arched Staircase Wall Niches with Artifacts

Introduction

Transform a monotonous, long hallway or staircase stairwell wall into an inspiring architectural gallery by carving a series of staggered arched niches into the drywall to display prized travel artifacts and sculptures.

What This Idea Means

This concept celebrates vertical storytelling, museum-grade curation, and architectural rhythm. It turns transitional hallway dead space into an engaging visual journey.

How to Make It

  1. Mapping Stairway Angles: Measure the diagonal rise of your staircase and map out a cascading series of varying-sized arched wall niches that follow the stair slope.
  2. Cutting Drywall: Cut out the drywall along your arched templates, framing each pocket securely with wood blocking between wall studs.
  3. Plaster Finishing: Line the interior of each niche with smooth plaster or paint them in a rich accent color to make displayed objects pop.
  4. Displaying Artifacts: Place single, powerful focal objects inside each niche—such as a terracotta pottery vessel, a bronze sculpture, or a trailing plant.

Tips and Variations

  • Tip: Install tiny recessed LED downlights in the top of each staircase niche to illuminate the stairway safely at night while highlighting art.
  • Variation: Line the back of the arched niches with antique mirror glass for added depth and sparkle in a dark hallway.

Needs to Make That Thing

  • Drywall saw, framing lumber, and wood screws
  • Joint compound, sandpaper, and interior paint
  • Miniature recessed LED stair niche lights
  • Curated art objects and sculptures

20. Oversized Arched Outdoor Garden Mirror

Introduction

An oversized arched mirror mounted against an exterior brick wall, fence, or patio nook creates an enchanting optical illusion of a hidden secret garden gateway, expanding small outdoor living spaces exponentially.

What This Idea Means

This design philosophy embraces outdoor illusion, whimsical secret-garden aesthetics, and landscape expansion. It turns flat boundary walls into portals of lush greenery.

How to Make It

  1. Selecting Weatherproof Materials: Choose an outdoor-rated arched mirror featuring a rust-resistant iron frame or rot-proof treated wood casing.
  2. Securing to Masonry: Mount heavy-duty masonry anchors securely into your exterior brick or stone wall at the correct height.
  3. Hanging and Leveling: Hang the heavy mirror using robust metal mounting brackets, ensuring it is perfectly level to prevent warping.
  4. Surrounding Landscaping: Plant creeping ivy, ferns, and potted hydrangeas around the base of the mirror so their reflection doubles in the glass, blurring the boundary between reality and reflection.

Tips and Variations

  • Tip: Choose a mirror with a muntin grid pattern that mimics a classic European greenhouse window for maximum architectural charm.
  • Variation: Angle the outdoor mirror slightly downward toward a stone water fountain to reflect trickling water and garden birds.

Needs to Make That Thing

  • Outdoor-rated weather-resistant arched garden mirror
  • Heavy-duty masonry drill bits and sleeve anchors
  • Level and socket wrench
  • Potted ferns and climbing ivy for base styling