Spread the love

Lighting is the secret heartbeat of interior design. It has the transformative power to turn a stark, uninspired room into a warm, inviting sanctuary. However, designer wall sconces and custom hardwired light fixtures often come with hefty price tags—not to mention the hassle and expense of hiring an electrician.

If you are looking to elevate your home decor with a touch of curated elegance while keeping your wallet happy, you are in the right place. Welcome to the ultimate guide featuring 20 aesthetic, amazing, and gorgeous DIY budget wall sconces. Whether your home leans toward modern minimalist, rustic bohemian, vintage antique, or Scandinavian cozy, these creative lighting solutions prove that luxury is a mindset, not a budget.

Introduction to Budget Wall Sconces: Why DIY Lighting is a Game-Changer

Wall sconces do more than just illuminate a dark hallway or frame a bathroom mirror; they act as sculptural art pieces that draw the eye upward and add layers of ambient warmth. The secret weapon of the modern DIY decorator? The puck light trick and clever cordless hacks. By utilizing battery-operated LED puck lights, rechargeable magnetic bulbs, or simple plug-in pendant kits threaded through creative wall brackets, you can install stunning wall lighting anywhere in your home without touching a single electrical wire.

Let’s dive into 20 incredible DIY wall sconce ideas, complete with step-by-step instructions, essential materials, expert styling tips, and unique variations.

1. The Scandi Wooden Dowel & Linen Drum Sconce

Concept & Aesthetic Appeal

Clean lines, warm natural wood, and diffused fabric make this sconce the epitome of Scandinavian minimalism. It casts a soft, inviting halo of light against neutral walls, making it ideal for a cozy reading nook or bedroom headboard.

Materials Needed

  • 1 wooden closet dowel or square oak strip (approx. 1 inch thick)
  • Small L-brackets and screws
  • A lightweight drum lampshade (linen or cotton fabric)
  • Battery-operated puck light with a remote control
  • Wood stain or clear matte polyurethane

Step-by-Step Instructions

  1. Cut your wood to create an L-shaped arm: a vertical wall mount piece (approx. 10 inches) and a horizontal hanging arm (approx. 8 inches). Join them securely using wood glue and reinforced pocket screws or dowel joints.
  2. Sand the wood smooth and apply your choice of light wood stain or clear sealant to showcase the natural grain.
  3. Mount the wooden arm securely to the wall using heavy-duty drywall anchors and screws.
  4. Attach a small interior hanging hook or mounting plate to the underside of the horizontal arm.
  5. Hang your linen drum lampshade from the hook. Secure the battery-operated puck light inside the top rim of the shade using heavy-duty double-sided mounting tape or magnetic strips.

Styling Tips & Variations

  • Variation: Swap the wooden dowel for a curved brass rod for a modern mid-century twist.
  • Styling: Pair this sconce above a minimalist nightstand paired with a trailing pothos plant in a ceramic pot.
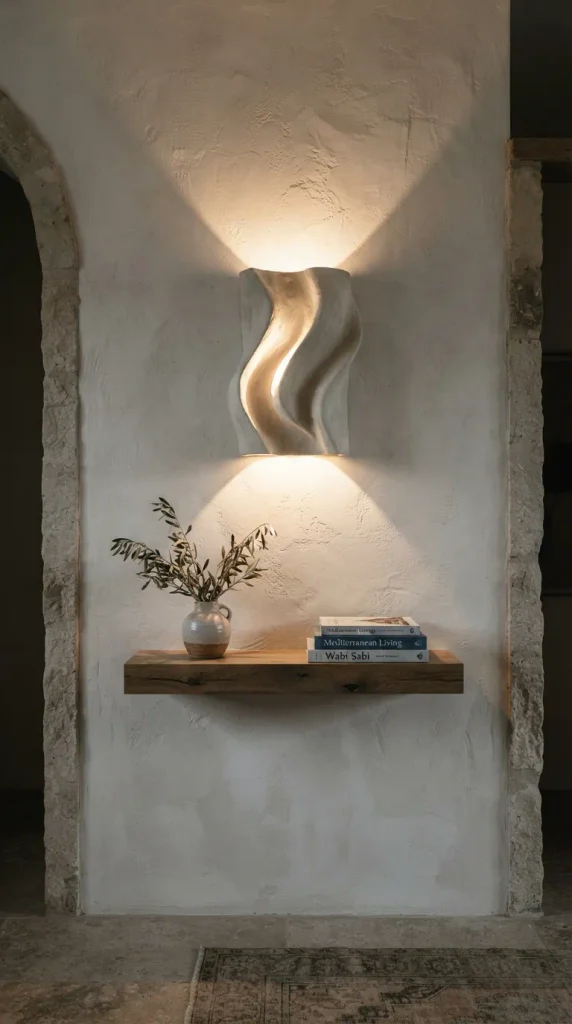
2. Textured Plaster Wave Sconce

Concept & Aesthetic Appeal

Inspired by high-end organic architecture and Mediterranean villas, this sculptural wall sconce looks like a piece of modern art by day and casts dramatic up-and-down lighting by night.

Materials Needed

  • A curved half-cylinder planter, thick cardboard mold, or arched scrap wood base
  • Joint compound (drywall mud)
  • Putty knife and coarse sponge
  • Matte white interior wall paint
  • Battery-operated LED wall sconce insert or puck light

Step-by-Step Instructions

  • Construct or select a sturdy half-circle or arched base to serve as the structural form for your wall sconce.
  • Apply a generous, thick layer of drywall joint compound across the entire surface using a putty knife.
  • While the compound is wet, use your fingers, a stiff brush, or a notched trowel to carve dramatic, organic waves, swirls, or fluted lines into the plaster.
  • Let the plaster dry completely for 24 hours until it hardens. Sand down any sharp, jagged edges lightly.
  • Paint the entire piece with two coats of ultra-matte white wall paint to give it a seamless, stone-like plaster finish.
  • Mount the base securely to the wall, embedding or placing your LED light source so that it casts light upward and downward across the textured surface.

Styling Tips & Variations

  • Variation: Add fine sand into your joint compound mixture for an authentic travertine or sandstone texture.
  • Styling: Mount this sconce in a neutral entryway paired with a round arched mirror and a sleek console table.

3. Rattan Basket Boho Dome Sconce

Concept & Aesthetic Appeal

Brings earthy textures and artisanal warmth into any room. By repurposing a flat woven rattan placemat or a shallow fruit basket, you create an effortless boho-chic light fixture that filters light through intricate woven patterns.

Materials Needed

  • A shallow round rattan fruit basket or sturdy woven placemat
  • Gold spray paint (optional, for interior rim detailing)
  • Heavy-duty hanging wire or small brackets
  • Battery-operated puck light or fairy light cluster
  • Wire cutters

Step-by-Step Instructions

  • If desired, lightly spray paint the center interior of the basket with matte gold to reflect a warm, glowing ambiance.
  • Create a small, discreet opening at the back or center of the basket if needed to secure your light source.
  • Mount a small, sturdy wall hook or standoff bracket directly onto the wall where you want your sconce placed.
  • Hang the rattan basket flush against the wall over the bracket.
  • Secure the battery-operated puck light inside the center cavity of the basket using Velcro strips so it can be easily removed for battery replacement.

Styling Tips & Variations

  • Variation: Use a black-painted wire basket lined with natural jute twine for a modern industrial-boho fusion look.
  • Styling: Perfect for styling above a rattan lounge chair in a sunroom or reading corner.

4. Vintage Brass Teapot & Saucer Accent Sconce

Concept & Aesthetic Appeal

Quirky, charming, and full of vintage character, this unexpected upcycled creation turns a thrifted brass teapot and saucer into a brilliant conversational wall accent.

Materials Needed

  • A thrifted vintage brass teapot and matching saucer
  • Metal adhesive (J-B Weld or industrial epoxy)
  • A battery-operated candle bulb or small puck light
  • Wall-mounting hardware and a small wooden plaque

Step-by-Step Instructions

  • Clean and polish your thrifted brass teapot and saucer until they gleam with vintage luster.
  • Using strong industrial epoxy, permanently secure the base of the brass teapot to the center of the matching saucer, creating an integrated wall plate and sconce bowl.
  • Cut the top off the teapot lid or remove it entirely to create an open cavity.
  • Mount a small decorative wooden plaque to the wall as a sturdy backing. Epoxy the back of the brass saucer securely to the wooden plaque.
  • Place your warm glow battery-operated light source inside the open mouth of the teapot, letting the light spill outward.

Styling Tips & Variations

  • Variation: Use a vintage copper kettle and matching mug set for a warmer, rustic farmhouse aesthetic.
  • Styling: Hang this whimsical piece in a cozy kitchen nook, coffee bar station, or eclectic dining room.

5. Minimalist Metal Hoop & Frosted Glass Sconce

Concept & Aesthetic Appeal

Sleek, sophisticated, and utterly modern. This design features a bold black or brushed brass metal ring framing a glowing frosted glass orb, bringing high-end boutique hotel vibes into your home on a tiny budget.

Materials Needed

  • A metal embroidery hoop or sturdy craft ring (approx. 10 to 12 inches in diameter)
  • Matte black or brushed brass spray paint
  • A small glass globe shade or thrifted glass light cover
  • Heavy-duty picture-hanging hardware or a leather hanging strap
  • Cordless LED puck light

Step-by-Step Instructions

  • Spray paint your metal hoop in your desired finish (matte black or brushed brass) and let it dry completely.
  • Secure the glass globe securely to the bottom inner curve of the hoop using clear-drying industrial silicone adhesive or a custom wire cradle.
  • Cut a strip of faux or genuine leather to form a hanging loop. Wrap the leather loop around the top of the metal hoop and screw it directly into a wall anchor.
  • Insert your battery-operated puck light into the base of the glass globe.

Styling Tips & Variations

  • Variation: Use a double-hoop nested design for added geometric depth and shadow play.
  • Styling: Ideal for framing a modern bathroom vanity mirror or hanging symmetrically on either side of a bed.

6. Fluted Wooden Tambour Sconce

Concept & Aesthetic Appeal

Fluted detailing is having a massive moment in interior design. This architectural sconce uses tambour molding or half-round wood strips to create rich vertical texture that catches shadows beautifully.

Materials Needed

  • Half-round wood moulding strips (available at hardware stores)
  • A thin wooden or MDF rectangular backing board
  • Wood glue and a miter saw or hand saw
  • Stain or paint of choice
  • LED wall sconce fixture or puck light

Step-by-Step Instructions

  • Cut your thin wooden backing board to your desired sconce dimensions (e.g., 4 inches wide by 14 inches high).
  • Cut your half-round wood moulding strips to match the exact height of the backing board.
  • Glue the half-round strips side-by-side across the entire face of the backing board using strong wood glue, creating a continuous fluted tambour surface.
  • Stain or paint the entire fluted piece in a rich walnut, oak, or matte black finish.
  • Mount the fluted fixture to the wall over a shallow battery-operated light source mounted directly behind the top curve, casting a wash of light down the fluted grooves.

Styling Tips & Variations

  • Variation: Paint the fluted surface in a moody sage green or deep charcoal to match accent walls.
  • Styling: Mount in a narrow hallway to add texture and vertical height to small spaces.

7. Industrial Plumbing Pipe & Edison Bulb Sconce

Concept & Aesthetic Appeal

Rugged, masculine, and effortlessly cool. This urban loft-inspired sconce uses galvanized or black iron plumbing pipes to create a striking mechanical silhouette.

Materials Needed

  • Black iron or galvanized pipe fittings (flange, 90-degree elbow, nipple pipe – approx. 6–8 inches)
  • A battery-operated faux Edison bulb pendant or puck light housing
  • Heavy-duty wall screws and anchors
  • Clear metal sealer (to prevent rusting if using raw iron)

Step-by-Step Instructions

  • Assemble your pipe fittings: screw the flange (wall plate) onto one end of the nipple pipe, and attach the 90-degree elbow to the other end facing downward.
  • Clean all pipe pieces thoroughly with rubbing alcohol to remove any manufacturing oils and coat with metal sealer.
  • Mount the assembled iron pipe securely to the wall using heavy-duty wall anchors through the flange screw holes.
  • Suspend a battery-operated vintage Edison bulb pendant or lightweight lantern from the downward-facing pipe elbow using jute twine or a small black S-hook.

Styling Tips & Variations

  • Variation: Spray paint the pipes in a luxe brushed gold or copper finish for a softer, industrial-glam hybrid look.
  • Styling: Perfect for a home office, study, urban loft bedroom, or man cave.

8. Oversized Paper Lantern Wall Pocket Sconce

Concept & Aesthetic Appeal

Lightweight, airy, and ethereal. This design cuts a traditional round paper lantern in half and mounts it flush against the wall like a glowing architectural sconce pocket, infusing rooms with Japanese wabi-sabi serenity.

Materials Needed

  • A round rice paper lantern or fabric lantern
  • Heavy-duty cardboard or wire ring for backing support
  • Scissors and hot glue
  • Cordless battery-operated warm LED bulb or fairy string lights

Step-by-Step Instructions

  • Carefully cut your round paper lantern cleanly in half along its vertical equator using sharp scissors.
  • Reinforce the cut edge of the half-lantern with a thin wire ring or stiffened cardstock rim glued to the perimeter to help it keep its semi-circle shape.
  • Mount a small flat wooden or plastic wall disc behind the lantern space equipped with your battery-operated LED light source.
  • Gently slide or tape the paper lantern pocket over the wall disc so it sits flush against the wall surface, diffusing a warm, gentle glow in all directions.

Styling Tips & Variations

  • Variation: Use textured mulberry paper or handmade parchment paper for a more rustic, tactile finish.
  • Styling: Best suited for calming meditation rooms, minimalist bedrooms, or serene guest suites.

9. Pressed Botanical Herbarium Glass Sconce

Concept & Aesthetic Appeal

A celebration of nature and vintage botany. This glowing double-pane glass frame sandwich preserves real pressed flowers and leaves, casting an enchanting botanical silhouette when illuminated from behind.

Materials Needed

  • Two identical glass floating picture frames (size 5×7 or 8×10)
  • Real pressed dried flowers, ferns, or leaves
  • Battery-operated LED strip lights or flat puck light
  • Double-sided mounting tape or small wall brackets

Step-by-Step Instructions

  • Open your glass floating frames and carefully arrange your dried pressed botanicals artfully between the two glass panes. Seal the frame shut.
  • Affix a low-profile battery-operated LED strip light or flat puck light to the back of the rear glass frame border so it faces inward and backward against the wall.
  • Mount the floating frame securely to the wall using sturdy picture hangers or specialized wall brackets that leave a small gap behind the frame for the light washout.
  • Turn on the light to watch the delicate veins of the leaves and petals glow with organic radiance.

Styling Tips & Variations

  • Variation: Use black metal-rimmed frames for a crisp modern herbarium aesthetic.
  • Styling: Gorgeous in botanical-themed bathrooms, sunrooms, or above a cozy writing desk.

10. Modern Ceramic Bowl Wall Sconce

Concept & Aesthetic Appeal

Sleek, organic, and sculptural. By mounting a minimalist ceramic bowl or deep dish sideways onto the wall with a hidden light source inside, you create a gorgeous indirect uplighter reminiscent of high-end European design.

Materials Needed

  • A small, lightweight ceramic or terracotta bowl (matte finish)
  • A heavy-duty wall-mounting plate or adhesive heavy-duty disc
  • Battery-operated puck light with remote control
  • Sandpaper (if needed to roughen the mounting surface)

Step-by-Step Instructions

  • Clean the base and exterior bottom of your ceramic bowl thoroughly.
  • Attach a strong, flat mounting disc or heavy-duty industrial velcro to the flat bottom exterior of the bowl and the corresponding matching piece to the wall anchor.
  • Mount the bowl securely onto the wall so that its opening faces upward or slightly outward.
  • Place your battery-operated puck light inside the hollow cavity of the bowl. When turned on, the light bounces off the interior ceramic glaze, casting a warm, indirect glow onto the wall above.

Styling Tips & Variations

  • Variation: Paint the interior of the bowl in a contrasting metallic gold or copper leaf for an unexpected flash of luxury when lit.
  • Styling: Perfect for adding ambient mood lighting in a minimalist living room or modern dining area.

11. Leather Strap & Frosted Glass Cylinder Sconce

Concept & Aesthetic Appeal

Equestrian-inspired and effortlessly chic. This design suspends a glass cylinder or hurricane vase from a thick loop of rich cognac leather attached to a brass wall peg.

Materials Needed

  • A strip of genuine or faux leather (approx. 2 inches wide by 18 inches long)
  • A brass wall peg, knob, or heavy-duty screw anchor
  • A cylindrical glass hurricane vase or glass candle holder
  • Battery-operated candle or puck light

Step-by-Step Instructions

  • Wrap your leather strip securely around the lower middle portion of the glass cylinder vase to form a tight supporting sling, and rivet or glue the overlapping leather ends together.
  • Form a hanging loop at the top of the leather strap.
  • Secure your decorative brass wall peg or knob firmly into a wall anchor.
  • Slip the leather loop over the brass peg so the glass cylinder hangs gracefully against the wall.
  • Place your battery-operated candle or puck light inside the glass cylinder.

Styling Tips & Variations

  • Variation: Use dark chocolate leather with black hardware for a moody, masculine aesthetic.
  • Styling: Stunning when installed in pairs framing a bedroom headboard or hallway mirror.

12. Macrame Pocket Plant & Light Sconce

Concept & Aesthetic Appeal

The ultimate bohemian multi-tasker. This hybrid wall hanging combines knotted cotton macrame cord with a pocket sleeve that holds both a glowing light source and a trailing air plant or faux greenery stem.

Materials Needed

  • Natural cotton macrame cord (3mm or 4mm)
  • A wooden ring or driftwood stick for the top hanger
  • A small glass jar or mason jar
  • Battery-operated fairy lights or puck light
  • Faux or real trailing plant (like English ivy or string of pearls)

Step-by-Step Instructions

  • Tie your macrame cord around your wooden ring or driftwood stick using basic square knots and gathering knots to create a net pocket that securely cradles your glass jar.
  • Place your glass jar inside the lower macrame pocket.
  • Insert your battery-operated fairy lights inside the jar, threading the battery pack discreetly behind the knotwork.
  • Add your trailing faux plant sprig into the jar alongside the lights so that green leaves cascade down over the macrame cords.
  • Hang the entire piece from a decorative wall hook.

Styling Tips & Variations

  • Variation: Dip-dye the bottom ends of the macrame fringe in terracotta or sage green fabric dye for an ombre effect.
  • Styling: Ideal for bohemian bedrooms, sunlit balconies, or cozy cottagecore kitchens.

13. Reclaimed Vintage Book Spine Sconce

Concept & Aesthetic Appeal

Intellectual, charming, and deeply nostalgic. This clever DIY repurposes vintage hardcover book covers and spines to create a clever bookish wall sconce that looks right at home in a cozy library or study.

Materials Needed

  • Hardcover vintage books with gorgeous textured spines and covers
  • A lightweight wooden support box or shadow box frame
  • Hot glue and heavy-duty craft knife
  • Battery-operated LED strip lights

Step-by-Step Instructions

  • Carefully remove the spines and front covers from several discarded vintage books using a sharp craft knife.
  • Arrange the book spines vertically around the sides of a small, open-faced wooden shadow box frame, gluing them securely in place so it appears to be a stack of bound books mounted to the wall.
  • Mount the open book box securely to the wall.
  • Line the interior cavity of the box with warm battery-operated LED strip lights so the light glows outward through the open front.

Styling Tips & Variations

  • Variation: Hollow out a single thick encyclopedia to house a puck light directly inside its pages.
  • Styling: A must-have statement piece for home libraries, reading rooms, or cozy home offices.

14. Salvaged Architectural Corbel Wall Sconce

Concept & Aesthetic Appeal

Historic, grand, and timeless. By mounting a salvaged wooden architectural corbel (or a budget-friendly resin reproduction) to the wall, you create a heavy, antique-looking shelf sconce that exudes heritage charm.

Materials Needed

  • A wooden architectural corbel or decorative wall bracket
  • Heavy-duty keyhole hangers or mounting brackets
  • Battery-operated candle lantern or wall sconce attachment
  • Antiquing wax or dark stain

Step-by-Step Instructions

  • Sand down your wooden corbel and apply a dark antiquing wax into the crevices to emphasize its carved details and aged patina.
  • Install heavy-duty keyhole mounting hardware securely into the flat back of the corbel.
  • Mount the corbel firmly into wall studs or heavy-duty toggle anchors, ensuring it can support weight.
  • Place a beautiful battery-operated hurricane lantern or candle sconce directly on top of the corbel shelf.

Styling Tips & Variations

  • Variation: Paint the corbel in distressed French country white or faded chateau blue.
  • Styling: Perfect for traditional entryways, living room mantel flanks, or dining room buffets.

15. Geometric Wire-Framed Cage Sconce

Concept & Aesthetic Appeal

Modern industrial meets geometric art. This minimalist cage sconce casts fascinating angular shadows across your walls while maintaining an open, airy silhouette.

Materials Needed

  • Geometric metal wire candle holder or small wire basket
  • Matte black spray paint
  • Wire cutters and heavy-duty mounting hooks
  • Cordless battery-operated pendant light bulb

Step-by-Step Instructions

  • If your wire geometric basket or candle holder isn’t the color you want, spray paint it with a smooth coat of matte black or satin brass and let dry.
  • Use wire cutters to create a discreet opening in the wire frame if necessary to fit your light source.
  • Mount a small wall hook or bracket at your desired height.
  • Hang the geometric cage from the hook. Place or hang your cordless battery-operated pendant bulb inside the center of the geometric frame.

Styling Tips & Variations

  • Variation: Use geometric wire frames shaped like diamonds or terrariums for added complexity.
  • Styling: Exceptional in modern teen bedrooms, contemporary living spaces, or studio apartments.

16. Driftwood & Mason Jar Coastal Sconce

Concept & Aesthetic Appeal

Breezy, nautical, and organic. This beach-inspired sconce pairs weathered driftwood washed ashore with classic mason jars wrapped in rustic jute twine.

Materials Needed

  • A piece of weathered coastal driftwood (cleaned and dried)
  • A Mason jar or glass canning jar
  • Jute twine or galvanized wire
  • Small L-brackets and wall screws
  • Battery-operated fairy string lights or tea light

Step-by-Step Instructions

  • Scrub your piece of driftwood clean and let it dry completely. Seal with a clear matte spray if desired.
  • Wrap heavy jute twine tightly around the neck of the Mason jar multiple times, creating a secure loop handle for hanging.
  • Screw small, discreet L-brackets or heavy-duty peg hooks into the back or top side of the driftwood log.
  • Mount the driftwood log securely to the wall using wall anchors.
  • Hang the twine-wrapped Mason jar from a hook or screw on the driftwood branch. Fill the jar with warm battery-operated fairy lights.

Styling Tips & Variations

  • Variation: Use sea glass beads threaded onto the twine for an extra pop of coastal color.
  • Styling: Perfect for beach houses, coastal bathrooms, or summer patio sunrooms.

17. Scalloped Cardboard & Plaster Wall Sconce

Concept & Aesthetic Appeal

Playful yet sophisticated. Scalloped edges are a major design darling right now. This lightweight sconce uses thick corrugated cardboard and joint compound to mimic high-end carved limestone.

Materials Needed

  • Thick corrugated cardboard or foam board
  • Scallop pattern template and utility knife
  • Joint compound and putty knife
  • Matte white acrylic paint
  • LED puck light

Step-by-Step Instructions

  • Draw and cut out a series of scalloped arches from your thick cardboard or foam board to form a curved wall sconce shell.
  • Assemble the cardboard pieces using hot glue to form a semi-cylindrical wall sconce shade with a scalloped bottom edge.
  • Coat the entire cardboard structure in a thick layer of joint compound to hide all paper ridges and create a solid plaster shell. Let dry and sand smooth.
  • Paint the finished scalloped sconce with matte white paint.
  • Mount over an LED light source attached to the wall.

Styling Tips & Variations

  • Variation: Paint the scalloped edges in a contrasting pastel pink or soft butter yellow.
  • Styling: Charming in nursery rooms, powder rooms, or playful dressing areas.

18. Hanging Copper Basin & Edison Bulb Sconce

Concept & Aesthetic Appeal

Sleek, reflective, and striking. This design uses a small copper mini-colander, bowl, or pan as a dramatic reflective reflector shade behind a warm light bulb.

Materials Needed

  • A small copper pie pan, mini colander, or small copper bowl
  • Drill and metal drill bit
  • Battery-operated pendant light kit
  • Wall mounting hook

Step-by-Step Instructions

  • Drill a single clean hole through the exact center bottom of your copper bowl or mini pan.
  • Thread your battery-operated pendant light cord through the center hole from the back, securing the bulb socket on the inside of the copper basin so the metal acts as a glowing reflector dish.
  • Mount a sturdy wall hook above your bedside or accent wall.
  • Hang the copper basin fixture from the hook, letting the cord drape gracefully.

Styling Tips & Variations

  • Variation: Polish the copper to a mirror shine or leave it naturally tarnished for a vintage farmhouse look.
  • Styling: Ideal for rustic kitchens, copper-accented dining rooms, or cozy industrial bedrooms.

19. Folded Origami Paper Pendant Sconce

Concept & Aesthetic Appeal

Architectural, lightweight, and modern. Origami paper folding creates intricate geometric facets that catch light and shadow in mesmerizing ways.

Materials Needed

  • Heavy-weight parchment or watercolor paper (large sheet)
  • Bone folder and ruler
  • Cordless LED puck light inside a small wire frame
  • Wall bracket

Step-by-Step Instructions

  • Follow an accordion or geometric origami crease pattern to fold your heavy paper into a pleated drum or diamond lampshade shape.
  • Punch small reinforcing eyelet holes at the top rim of your origami shade so it can hang securely without tearing.
  • Hang your folded paper shade from a minimalist wooden wall bracket.
  • Place a battery-operated LED puck light safely inside the center of the paper structure.

Styling Tips & Variations

  • Variation: Use Japanese Chiyogami paper with gold foil floral patterns for an exquisite Asian-inspired accent.
  • Styling: Perfect for serene home offices, reading nooks, or minimalist entryways.

20. Stained Glass Suncatcher Wall Sconce

Concept & Aesthetic Appeal

Colorful, vibrant, and artistic. This stunning DIY uses faux stained glass paint or real glass panels framed in lead came to project breathtaking colored light patterns across your walls when illuminated.

Materials Needed

  • A small glass window pane or picture frame glass
  • Glass paint or liquid leading outlines
  • Stained glass window pattern design
  • Wall-mounted LED backlit frame or puck light bracket

Step-by-Step Instructions

  • Create or trace a stained glass design onto your glass panel using liquid leading lines. Let dry.
  • Fill in the enclosed sections with vibrant translucent glass paint colors (such as amber, emerald, cobalt blue, and ruby). Allow to cure completely.
  • Mount the finished stained glass panel onto a shallow wall-mounting box equipped with an internal battery-operated LED light panel.
  • Turn on the light to watch your walls transform into a cathedral of glowing colored light.

Styling Tips & Variations

  • Variation: Use real thrifted small stained glass panels hung in front of a battery-operated backlit wall sconce box.
  • Styling: Breathtaking in bohemian living rooms, meditation corners, or hallway accent walls.

Conclusion & Future Inspiration

Creating high-end interior lighting doesn’t require a professional contractor or an expensive trip to a luxury lighting showroom. With a little creativity, simple thrifted finds, and clever cordless LED hacks, you can customize your home with stunning, one-of-a-kind wall sconces that reflect your unique personal style.